Showing posts with label Pasta. Show all posts

Thursday, January 3, 2013

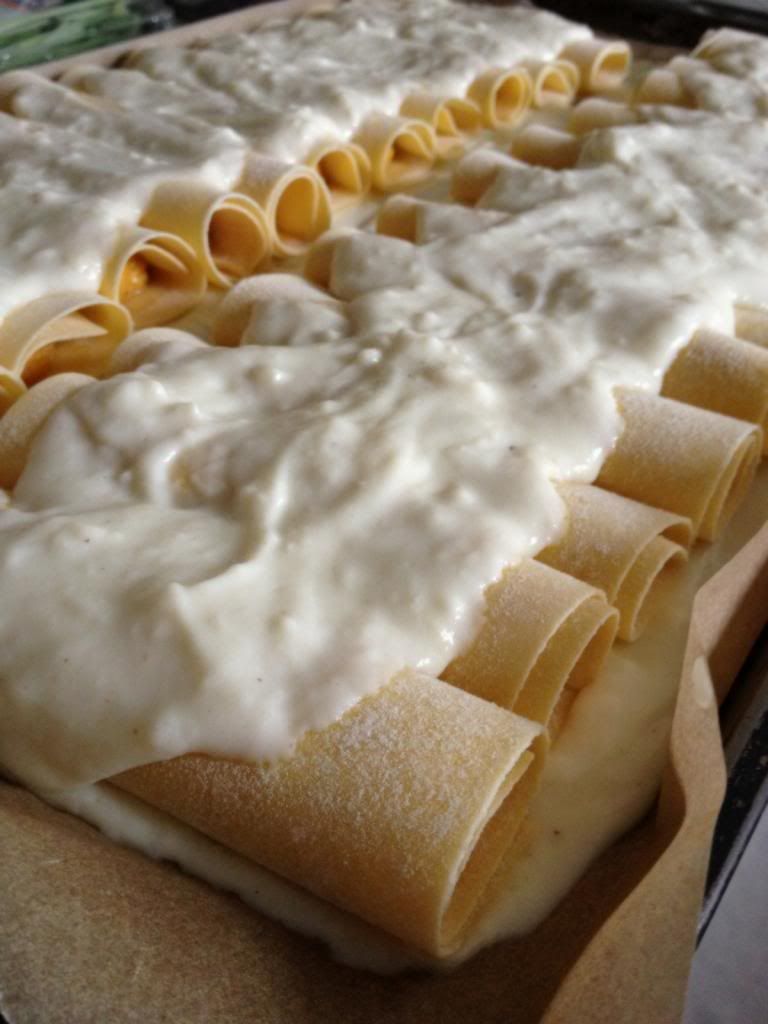
Three Cheese Butternut Squash Cannelloni

Cannelloni....It's a great word, isn't it? Cannelloni, cannelloni, cannelloni.  I think I could go around saying it all day and would never get tired of it.  And then I might switch to cannolli.  One fewer syllables, but just as tasty.  Gotta love Italian, it's a language that just rolls off the tongue and the words are always just so much fun.

The family members that I served this to on Christmas Eve had just as much fun with the word cannelloni that I did.  The word was bouncing around my Mother in Law's table amid snippets of laughter, conversation, and several mismatched courses of dinner which were only tied together by the people sitting around the table.  Everyone brought something to the party- old favorites shrimp creole and potato pierogies, newcomers like spinach salad and chocolate babka and the newest comer to the party, butternut squash cannelloni.  By the end of the meal, we were all in agreement about three things.  First, it had been an unexpectedly mellow and enjoyable evening.  Second, the craziness of the preparation for dinner had been worth it as we shared one very delicious meal.  And last, but not least, I needed to share the cannelloni recipe on my little blog.  Mostly just because we wanted my niece Jeannette to stop saying "I love these cannelloni"!
I'm happy to oblige.  So this is for my Mom, Helen, Jeannette and Mary Ann.  I hope you enjoy making the cannelloni for yourselves as much as I did creating it for you.

Three Cheese Butternut Squash Canneloni
Serves 6-8 people. 
For the printable recipe, click here.

I made these cannelloni in the heavily Italian-influenced South Jersey.  Because of that, I had access to fresh lasagna noodles on Christmas Eve morning.  If you aren't lucky enough to live near a market where you can get fresh pasta, you can certainly make your own.  May I also suggest that using store bough dried pasta would be perfectly acceptable.  You can use lasagna noodles or even shells.  You would simply need to cook the dry pasta for about half the suggested cooking time to soften them up enough to work with.

Filling:
1 medium butternut squash, halved lengthwise and seeded
1/2 cup ricotta cheese
1/3 cup parmesean or pecorino cheese
1/4 tsp nutmeg
1-2 tbs fresh sage (to taste)
1/2 cup chopped hazelnuts (not quite coarsely chopped, but not fine either- somewhere in between)

1 lb fresh lasagna noodles

Bechamel:
2 tbs butter
3 tbs flour
2 1/4 cup milk
2 cups grated gruyere cheese
1/4 tsp nutmeg

salt and pepper to taste

Preheat your oven to 425 degrees.  Drizzle the cut sides of the squash with a bit of olive oil and place them face down on a baking sheet.  Roast for 40-45 minutes or until a knife easily passes through the flesh.  Let cool completely.

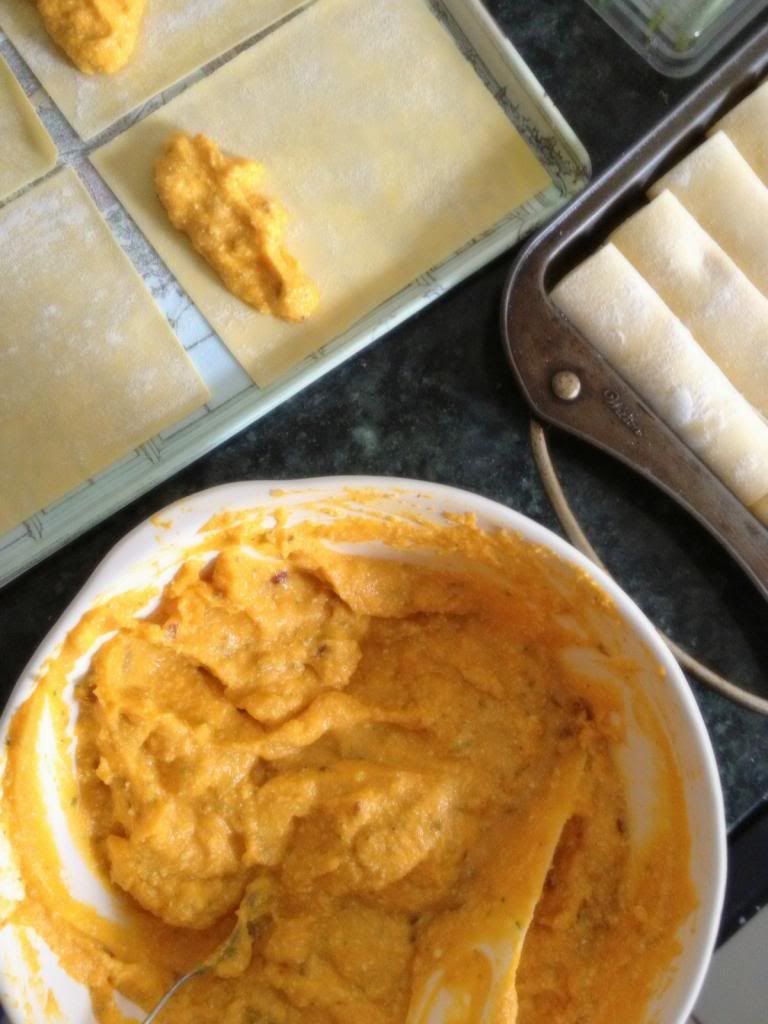
Scoop the cooled squash from the skin and place in a food processor.  Puree the squash.  Add the ricotta, parmesean, nutmeg and sage to the food processor and process just until the ingredients are thoroughly mixed.  Transfer to a bowl and stir in the hazelnuts.  Season with salt and pepper to taste.  The filling can be used right away or made a day ahead and refrigerated.

Start the bechamel sauce by melting the butter in a large saucepan.  Sprinkle the flour over the melted butter and stir for 1 minute.  Do not let the flour brown.  Slowly add the milk, stirring constantly to avoid lumps.  Over medium heat, cook the sauce until it becomes thick and bubbly, stirring frequently.  Remove from the heat and add the nutmeg and gruyere cheese.  Stir until the cheese is melted.  Let the sauce cool while you prepare the cannelloni.

Bring the oven to 375 degrees.  Soak the fresh lasagna noodles for 1 minute in warm water.  Remove them and gently dry on a tea towel.  Cut them in half crosswise so that you have 4 inch lengths of pasta.  Spoon about 2 tablespoons of filling across the short side of the pasta about 1/2 inch from the edge.  Starting from that edge, roll the pasta to encase the filling and place seam side down on a rimmed baking sheet that has been spread with a layer of the bechamel sauce.  Continue filling and rolling the pasta.  You should be able to fit two rows of cannelloni on your baking sheet.  If you need to pack them tightly, that is just fine.  Spoon the remaining bechamel along the center of each row of cannelloni, gently spreading it a bit toward the edges.

Bake covered with foil for 25 minutes.  Remove the foil and bake for an additional 20 minutes until the sauce is lightly golden and bubbly and the pasta is cooked through.  Let the cannelloni stand for 5 minutes before serving.


Saturday, October 27, 2012

Nana's Ricotta Cavatelli

I'm back. It was a long few weeks with no access to this little blog space and I missed it more than I thought I would.  When you rely on technology, sometimes it lets you down.  It happens and I accept that.  In the meantime, I've been cooking up a storm, taking pics, getting my garden ready for winter veggies, and focusing my time on my kids and my Etsy business.  And now thanks to the tech-lovin' husband of a friend, I'm up and running again.

As I was browsing through my almost 500 photographs trying to choose which one to write about first, one shot definitely stuck out at me.  It wasn't the best shot I had taken, but probably the most meaningful to me, so I thought I should start from there.  It's my three year old son's hands rolling out a piece of home made pasta the same way my grandmother taught me when I was little.

These little pastas are probably my favorite thing in the whole wide world.  I suppose for many reasons.  First and foremost, because they are tasty little pillows of deliciousness.  But also because they connect me to my family. I can remember standing next to Nana and using my little fingers to roll bits of dough across the wooden board.  When there was a big family dinner, she'd break out the hand-cranked machine and I'd help her feed the snake of dough between the rollers as little cavatelli shot out of the other end.  Seriously fun stuff for a little kid.  And now, seeing my son's hands repeat the same learning as my own did many years ago, it really drives home the point that oftentimes it's not the end result that counts but what you experience to get there.  And more importantly, who you share that experience with.
The recipe is simple.  Just a few ingredients lovingly put together to create a whole that is greater than the sum of its parts.  It's one of the first recipes I wrote in a little notebook given to me as I was planning my wedding and that I still pull out to jot down family recipes and my own ideas today.


Nana's Ricotta Cavatelli
Serves 3-4 people, but the recipe can easily be multiplied.
For a printable recipe, click here.

These cavatelli are very much like a gnocchi, only made with ricotta instead of potato.  You don't have to roll them out on the pasta board if you don't want to- simply cut the pasta into 1 inch pieces.  I think rolling them gives them a less chewy (i.e. more pleasing) texture and the little scoop you create is the perfect hiding spot for sauces.  But that's up to you.  I found my wooden boards at specialty kitchen shops, but you can also use the tines of a fork for rolling the cavatelli.  Lastly, if you can get your hands on some semolina flour the taste of the pasta will be all that much more interesting. 

1 lb. whole milk ricotta
1 lb. unbleached all-purpose flour, about 3 cups (you can use half all-purpose and half semolina flour as well)
1 egg

In a large bowl or on a clean counter, mix  2 1/2 cups of the flour, the ricotta and egg together with your hands.  Add more flour as needed.  You may not need all of the flour depending on how wet your ricotta is.  I was using very well drained home made ricotta, so I didn't need as much.  You are looking to create a smooth, not sticky dough. But you also don't want it to be dry.  You will know you have enough flour when the dough just comes together and is no longer sticky.

Knead the dough a few times on a floured work surface.  Cut it into 8-10 pieces. Working with one piece at a time, roll the dough into a log with a diameter of about an inch.  Cut the log into 1 inch pieces.  If using the wooden shaping board, roll each piece across the length of the board with your thumb, pushing down slightly to create a curved, shell-shaped piece of pasta. Transfer the pasta to a lightly floured baking sheet.

At this point you can cover the baking sheet with plastic wrap and refrigerate the pasta or freeze it.  If you freeze it, once the pasta is completely frozen, transfer it to a freezer bag.  It will keep for several months.  If cooking right away, place in a large pot of boiling, salted water.  The pasta is ready when it floats, about 3 minutes.  It is wonderful with a simple tomato sauce and some grated pecorino romano cheese.


Tuesday, September 18, 2012

Fresh Tomato Fettucini Aglio e Olio and a Food Preservation Class


This is the last tomato recipe for quite a while, I promise.  But I just couldn't resist sharing it with you.  The beauty of this dish lies in its simplicity and freshness.  And its source was one of pure joy for me.
This beautiful estate was the setting for a full day of tomato madness- tasting, cooking, "putting up", and drinking- everything that is possible to do with a tomato to save it beyond its summer season.  All of this tomato-ness was part of the series of food preservation classes at the Institute of Domestic Technology in Alameda, California (I just love the tongue in cheek, throwback to the 50s name!).  The Institute is a brilliant combination of informational and hands-on classes teaching foodies how to do everything from making simple cheeses to mixing up homemade cocktail bitters and canning jars of green tomato chutney.  It is the brainchild of Joseph Shuldinger (a Master food preservationist himself) and now has classes nearly every weekend for students from all walks of life.  It's simple, honest food from scratch cooked by people who love to eat.  What could be better?

My wonderful hubby purchased me a spot in the Saving the Season:Tomatoes class for my birthday a couple of weekends ago.  And it was certainly a great way to spend my day- laughing, cooking and learning from the instructors as well as the others students in a gorgeous setting.  The class was held in the kitchens of The Greystone Mansion in Beverly Hills, a beautiful home (the largest in Beverly Hills!) nestled in the hills with a surprisingly storied history which is now a city park.  As we chopped and chatted in the butler's kitchen, it was hard not to get swept up in the grandeur and history of the place.  But then there were the tomatoes, so many tomatoes...

The class was led by both Shuldinger and Kevin West, blogger at Saving the Season and soon-to-be cookbook author.  I was blown away by Kevin's green chutney recipe, so much so that I came home and pulled all of my green tomatoes from the vines just so that I could make myself a batch.  But as the recipe is in his cookbook which has yet to be published, I don't think I ought to be sharing it.  You'll just have to wait for the spring and his book!

What I feel I can share with you is the recipe for the fresh tomato fettucini that we made after a wonderful farmer's market lunch.  Made from three simple ingredients, flour, eggs and home made tomato paste, the pasta was the easiest and most fun ways we used our preserved tomatoes that day.  It was made even better by the laughter of competition between groups to make the best looking pasta while trying to keep our pasta machines held to the table without and clamps!  I brought my share of the pasta home and had it for lunch the next day dressed simply with olive oil, garlic and a few snipped slow roasted tomatoes.  Perfection.


Fresh Tomato Fettucini Aglio e Olio (With Olive Oil and Garlic)
Makes about 3/4 lb- enough for four servings.
For a printable recipe, click here.

You can make this pasta either by hand or in a food processor.  I prefer the hand method- there's just something about kneading pasta dough that I find therapeutic- but the food processor method is just as good and is a bit easier to clean up.  I'll give instructions for both.

1 1/2 cups all purpose flour
1/2 tsp salt
2 large eggs
2 tbs tomato paste
1/4 cup extra virgin olive oil
1-2 large cloves garlic, finely chopped, pressed or grated (depends on how garlicky you like it!)
3 tbs chopped slow roasted or sun dried tomatoes

To make dough by hand:  Put flour and salt in a pile on a clean counter.  Make a well in the center of the pile and crack the eggs into the center of the well.  Add the tomato paste to the eggs and beat the eggs and paste gently to incorporate.  Slowly begin to bring the flour into the wet mixture, pulling in from the sides with the fork.  At the same time, using your other hand, build up the walls of the well.  At some point, the fork will get too clogged up and the walls of the well will collapse.  At that point, switch to using your hands to incorporate the last of the flour.  Knead the dough for 5-10 minutes, until smooth and elastic.  You can add up to 2 tbs more flour as needed if the dough is too sticky.  Let the dough rest covered with plastic wrap or an inverted bowl for 30 minutes.

To make the dough using a food processor:  Add flour, salt, eggs and tomato paste to the bowl of a food processor.  Process until the dough just comes together, about 20 seconds.  Turn the dough out onto a lightly floured counter and knead following the instructions above for the hand method.

Cut the rested dough into 8 pieces.  Working with one piece at a time (keeping the others covered), slightly flatten dough, dust it with flour and feed it through a pasta machine at its widest setting.  Fold the dough in half, lightly dust with flour and feed through the same setting.  Turn the pasta machine to the next widest setting, lightly flour the dough and pass through the machine.  Continue to pass the dough through the machine using even lower settings and dusting with flour as needed until you have a very thin and almost translucent sheet of pasta (this would be an 8 on a hand machine like an Atlas or a 5 or 6 on a Kitchen Aid mixer attachment).  Place the sheet of dough on a lightly floured counter or pasta drying rack for 10 minutes, then cut into strands using a pasta machine's cutting attachment or by hand.

To cook:  Cook the pasta in a large pot of boiling salted water until al dente, which will take only 1 or 2 minutes.  While the pasta is cooking, place the olive oil, garlic, and chopped dried tomatoes in a medium saute pan.  Slowly heat up the oil (on a medium or medium low setting) until the garlic becomes fragrant, stirring.  When the pasta is cooked, drain and place in the pan with the oil mixture.  Gently toss and remove from heat.  Serve, sprinkled with a few thyme leaves. 


Thursday, April 26, 2012

Spaghetti Carbonara with Peas and Spring Onions

I spent yesterday afternoon readying my garden for summer.  I transferred all my tomato, cucumber and watermelon seedlings into the ground from the flat that I had started them in.  I weeded, removed old broccoli plants, and picked some beautiful carrots.  And then this crazy storm hit.  Literally in about 10 minutes it went from a sunny, cloudless and almost muggy hot day to what I imagine Kansas looks like before a tornado.  The temperature dropped 15 degrees, the sky turned dark and the wind started whipping through.  You could hear crashes throughout the neighborhood of trash cans being blown around.  I was seriously worried that we were in for some major storm.

My first thought was to all of those new little plants I had just gotten in the ground.  What would driving rain do to those precious seedlings that I grew from seeds carefully preserved from last years tomatoes?  Would they be crushed or washed away because their roots hadn't had time to take hold?
I'm happy to report that all is well today.  Within a half hour of the initial change in weather it was sunny and calm again.  We did eventually get some rain overnight, but upon inspection this morning, my seedlings are still standing tall and ready to grow into what I hope will be an abundance of fruits and vegetables this summer.  Phew!

In the meantime, I'm happily enjoying all that the spring has to offer.  This week my CSA box came to me full of English pea pods, which I happen to love, love, love.  I decided to reprise an old standard of my Mom's- noodles with bacon, cream and peas.  Only instead of cream I went with a carbonara sauce, my favorite way to eat spaghetti (simply made from eggs, cheese, and some pasta cooking water).  I loved how the sweet peas and spring onions cut through the richness of the sauce and played off the salty bacon.  Simple and just what I needed.

While the summer tomatoes are still a long way off, I'm pretty sure the peas, asparagus, onions, carrots and artichokes will be enough to carry me through the spring.
Spaghetti Carbonara with Peas and Spring Onions
Serves 4

1/2 lb dry spaghetti
4 slices bacon or 3 ounces pancetta, chopped
1 heaping cup shelled peas (you can use frozen peas if you can't find fresh ones at the market)
1 large spring onion or leek, white and light green parts coarsely chopped
1/2 cup grated pecorino cheese
3 eggs (the fresher, the better)

Bring a large pot of salted water to boil for the pasta.

In a large saute pan, cook the bacon or pancetta until crisp.  Remove and drain on a paper towel.  To the hot pan, add the spring onions or leeks.  Turn the heat to medium and slowly cook the onions until they are very soft and translucent (about 10 minutes).  The leeks and pasta should take about the same amount of time to cook, so when you put the leeks in the pan add the spaghetti to the pot of water.

With about 2 minutes left for the pasta to cook, add the peas in with the spaghetti.  Before draining, scoop out about a 1/2 cup of the pasta water and reserve.

In a large bowl, beat the three eggs.  Scrape the onions and any remaining bacon drippings from the pan into the eggs and stir in the bacon and pecorino cheese.  Toss the cooked spaghetti, peas and half of the reserved cooking water into the bowl and quickly stir.  The heat from the spaghetti will cook the eggs.  If you'd like a looser sauce, add more of the pasta cooking water a little at a time until you reach your desired consistency.  You can also toss all the ingredients in the saute pan to save yourself having to wash the bowl, but I've had a hard time with the pan being too hot and scrambling my eggs before I can get them mixed with the pasta.

Serve with additional grated cheese for topping.


Thursday, November 10, 2011

Butternut Squash Gnocchi with Sausage and Kale

I've been debating whether or not to post this recipe.  Not because it isn't good- it totally is.  But I've been a bit pumpkin and squash obsessed lately and you, my faithful readers, may be getting a smidge tired of it.  I can just hear you all, sitting at your computers and reading the title to this post muttering, "Enough already, Renee.  Move on.".  But I can't help it.  From my CSA box to the grocery stores, I'm surrounded by gourds of all shapes and sizes and I feel an urgent need to do something with them.  So I be grateful if you would indulge me for just one more squash posting.

And yes, it's also another pasta recipe.  And yes, I did make it by hand.  But hear me out- you don't have to make the pasta if you don't want to.  By the way, it's totally worth the effort, even if all you do is pan fry them in butter and not even make the sauce.  I could have snacked on those buttery little dumplings all night long.  But I digress...  If you don't have the time, energy, or inclination to make gnocchi by hand take a look down by the recipe directions.  I am also giving you instructions on how to switch up the ingredients and, using store-bought gnocchi, make a delicious dinner with less fuss then the handmade version but the same wonderful flavors.
So I suppose, in the end, I decided to share this recipe with you because it tastes fabulous and there are so many ways you can make it your own that it can work for just about anyone.  {Unless you happen to be my husband.  Or my oldest son.  Neither of them cared for it.  My husband has come to the conclusion that he's just not a gnocchi guy.  The boy, well, I think he would have liked it if the gnocchi were boiled and not fried.  Usually when I make them he runs around the house shouting "gnocchi" in his worst Italian accent.  It's pretty funny actually.}  So I ate my gnocchi by myself, savoring every last one of them.  Because it's a dish I can only make if I'm all by myself for an evening.  And I think we all know how often that's going to happen.  Sigh.
I just love how an acorn squash looks like a heart.  Don't you?
Butternut Squash Gnocchi with Sausage and Kale
Makes 4-6 servings
Here's where I tell you that you can get the same flavors in the dish with a bit less work if you aren't into making the gnocchi yourself.  You can buy packaged gnocchi in your grocery store (sometimes it's in the pasta section, sometimes in the specialty foods area) and you can even get pre-cut butternut squash.  I would probably cut those squash cubes into halves or even quarters of what they are already cut into.  Those big cubes just won't cook in the amount of time you will have.  Cook the gnocchi according to package directions or pan fry in butter like I do the gnocchi in this recipe.  Cook the squash in the sauce after you add the chicken broth and simmer for 8-10 extra minutes to soften the squash before adding the kale.  Follow the rest of the directions for the sauce.

For the gnocchi:
1 butternut squash (about three pounds)
2 eggs
1 tsp salt
1/4 tsp nutmeg ( I use nutmeg in any recipe with squash and/or leafy greens)
3-4 cups flour (depends on the water content of your squash)

Cut the squash in half lengthwise (be careful, the squash is very hard and can be tricky to cut).  Drizzle the cut sides with olive oil and place face down on a baking sheet.  I had a small acorn squash languishing on the counter, so I threw that in too.  Roast in a 375 degree oven for 45 minutes to an hour.  The flesh should be very soft.  Let the squash cool.
When the flesh is cool, scoop it out into a large bowl and mash it with a fork.  Add the eggs, nutmeg and salt and stir to fully incorporate.  Add 2 cups of the flour and mix.  Continue adding the flour, in half cup increments, until you have a soft, sticky dough that holds together.  My squash must have had a lot of water because I seemed o have to keep adding flour.  I ended up at about 4 cups total.  I also found that at the end, dumping the dough onto the counter and kneading in the last of the flour by hand was helpful.  I generously sprinkled the counter top with flour.
Using a knife or bench scraper dipped in flour, cut off a piece of dough and roll it into a 1 inch diameter "snake".  Cut the "snake" into 1 inch pieces.  Sprinkle the cut pieces with flour to keep them from sticking.  You can press the traditional lines into the gnocchi by gently pressing the tines of a floured fork into the dough.  I demonstrate this technique in the photo below.  Continue cutting, rolling and shaping the ghocchi until you have used all the dough.  You can use the gnocchi right away or put on a floured sheet tray covered loosely with plastic wrap and keep in the refrigerator until you are ready to cook them.
I chose to pan fry my gnocchi, which I did in a large saute pan with melted butter.  Lay enough gnocchi in the pan to cover the bottom and let cook over medium heat for 3-4 minutes or until browned.  Flip the gnocchi and cook until browned on the other side, another few minutes.  This will probably have to be done in batches unless you have a HUGE pan.  Add a tablespoon or so of butter to the pan before each batch.  Reserve in a bowl to add to the sauce.  Alternately, you could cook the gnocchi for 4-5 minutes in a large pot of boiling salted water as you are preparing the sauce.
The pan-fried gnocchi.  Great for snacking on all on their own.
For the sauce:
1/2 lb Italian sausage, removed from the casings
2 cloves garlic, finely chopped
a pinch of red pepper flakes
1 1/2 cup low sodium chicken broth
1 small bunch of tuscan kale, stems removed and roughly chopped
1/2 cup pecorino romano or parmesean cheese

In a large saute pan, cook the sausage in 1 tbs olive oil until browned.  Add the garlic and red pepper flakes and stir for about 1 minute.  Pour in the chicken broth, making sure to scrape up any bits from the bottom of the pan (that's all flavor hidden in there).  Toss in the kale and stir.  Simmer the sauce for 4-5 minutes or until the kale has wilted.  Add the cooked gnocchi to the pan and stir all the ingredients together.  Stir in the cheese and serve.

Monday, October 24, 2011

Pumpkin Ravioli with Brown Butter Sage Sauce


My grandmother, Nana, is the first person I can remember cooking with.  That was her job, but she also loved doing it.  She and my grandfather owned a little Italian bakery in South Jersey.  The bakery was downstairs and they lived upstairs.  Because of that, you couldn't escape the smells that came from downstairs- yeast, vanilla, honey, chocolate, almonds... the same scents that instantly transport me back to my childhood.  My grandparents closed the bakery when I was still small, but the memories of standing on a stool next to my Nana and kneading dough to make little breads or making watermelon ice (what we fancy gourmet folks call granita nowadays) in her hot upstairs kitchen will stay with me forever.


Nana always cooked our birthday dinners.  She would ask us what we wanted, but the answers were always the same, so I don't know why she bothered.  My sister always asked for ravioli and I would always ask for her cavatelli (or in her antiquated southern Italian dialect, cavadelies) which are named for the shape but are really ricotta gnocci.  Those cavatelli are really a labor of love, but Nana was always happy to indulge her granddaughter.  I would help her though, making the pasta by hand, rolling it into ropes, cutting each little nugget of dough and then shaping each piece on a little ridged board.  I have two of those boards in my kitchen now and my oldest son loves to help me shape the dough when I make them.   It's like playing with play dough for him.  I promise I'll share the cavatelli recipe someday, it's so easy to make and just requires a bit of patience to finish pasta.  I feel like a kid again when I make them.


I don't think Nana ever made pumpkin ravioli and if she did we would have looked at her like she was crazy.  Isn't pumpkin just for pie?  I suppose they didn't really make a lot of winter squash in her southern Italian home in Calabria- it's much too Mediterranean there.  In nothern Italy, however, butternut squash and all sorts of pumpkins are common fillings for ravioli.  Nana did make killer traditional ricotta-filled ravioli, though, which she managed to make perfectly each and every time.  I'm sure it was the great little ravioli press that she had.  You can still get them and I wished that I had hers while I was making my ravioli.  Getting the shape right and the edges pressed perfectly so that the filling doesn't ooze out is tough.  Despite a few setbacks (dough sticking to the counter, holes that I couldn't patch, a few ravioli that lost their filling while cooking) I think I still made a dinner that Nana would be proud of.  One that I wish I could have shared with her if she didn't live a few thousand miles away.  She would have declared them bella.  Ti voglio bene Nana.


Pumpkin Ravioli with Brown Butter Sage Sauce
Makes about 2 dozen ravioli

I made my own dough for this recipe, because I'm Italian and that's what we do.  If you really wanted to, you could cheat and use wonton wrappers for the dough.  Try making the dough once, though, I promise it's worth the effort.  If you like, you could substitute roasted and pureed butternut squash for the pumpkin.

For the dough (based on Tyler Florence's recipe):
2 cups all-purpose flour, plus more for dusting
1 tsp kosher salt
3 eggs, plus one egg yolk
2 tbs olive oil

For the filling:
1 cup pumpkin puree (NOT pumpkin pie filling!)
8 oz whole milk ricotta
1/4 cup freshly grated pecorino romano or parmesean cheese
1 egg
1/4 tsp freshly grated nutmeg
2 tsp finely chopped fresh sage

For the sauce:
3 tbs butter
3 sage leaves
1/3 cup heavy cream

Make the dough:
In the bowl of a stand mixer fitted with the dough hook, mix the flour and salt.  With the mixer on low speed add the eggs and egg yolk one at a time, incorporating each one before adding the next.  Mix in the olive oil.  Raise the speed to medium and knead until you have a soft and supple dough, 4-5 minutes.  Wrap the dough in plastic and let it rest on the counter at least 1 hour.

In the meantime, make the filling.  In a medium bowl, mix together all of the ingredients and refrigerate until ready to use.

Cut the ball of dough in half and cover the unused portion with the plastic again to keep it from drying out.  Dust the counter with flour and press the dough into an approximately 1/2 inch rectangle.  Using a pasta roller, run the dough through the widest setting 2 or three times, folding the dough in half and dusting with flour as needed in between each run.  Lower the setting on the pasta roller and run the dough through the narrower setting.  Continue to decrease the settings and run the dough through until the dough is about 1/8 of an inch thick (setting 5 on the Kitchen Aid pasta roller).  If the dough gets too long to handle, cut it in half cross-wise and continue rolling.  I had to do that at about setting 4.  Lay the sheets of dough on a lightly floured work surface (trust me, flour under the entire piece of dough, sticking is not something you want to have happen) and cover with a clean kitchen towel while you roll out the remainder of the dough.

When the dough is rolled out, make the ravioli.  Using two spoons, scoop about 2 tbs filling onto the center of the dough about 3/4 of an inch from the edge.  Continue spooning the filling onto the dough, leaving about 1 1/2 inches between each scoop.

Brush a bit of water or beaten egg along the edges of the sheet of dough and in between each scoop of filling.  Carefully lay another sheet of dough over top, pressing along the edges and in between the filling to let the air escape and seal the dough together.  Using a knife or pastry wheel, trim the edges of the dough and then cut in between each ravioli.  Lay the completed ravioli on a floured baking sheet, being careful not to let them touch.  The ravioli can be refrigerated until you are ready to use them or used immediately.  They can also be frozen on the sheet pan and then packed into freezer bags.

When you're ready to cook the ravioli, bring a large pot of salted water to a boil.  While the water comes to a boil, make the sauce.  Place the butter in a large skillet set over low heat.  Slowly melt the butter and let it brown, but not burn.  Thinly slice the sage leaves and add them to the butter once it is browned.  They will sizzle when you first put them in, fun!  After a minute, add the heavy cream and heat the sauce through.  Keep it on low heat until the pasta is cooked.  When the water reaches a boil, carefully add the ravioli one at a time to the pot.  Simmer until the pasta is cooked, about 4 minutes.  Gently remove the ravioli with a slotted spoon and place them in the skillet with the sauce.  Spoon the sauce over the ravioli.

Serve with a salad on the side for a wonderful, hearty dinner.  Mangia!


Wednesday, July 20, 2011

Pasta with Roasted Garlic Pesto

My garden is in full swing these days.   Tons of little green tomatoes and peppers of several varieties, tiny heirloom watermelons, lots of herbs.  In a few weeks I hope to be able to start picking the cherry tomatoes, the first ones are just beginning to turn red.  In the meantime, I've satisfied myself with using the fiery red fresno chiles in salsas and the herbs, most especially the basil.

I think this might be the third or fourth post in which I've used basil or pesto, that's how much love the stuff.  I'm Italian, it's in my blood.  So when, about a week ago, I ran across a comment in a Food and Wine Facebook thread about roasted garlic pesto with pasta, my heart skipped a beat with excitement.  I never thought to try roasted garlic in pesto, that sharp raw garlic bite is a hallmark of the original.  But why shouldn't it be great?  The mellow flavor of the roasted garlic goes with just about anything, so it should make a nice, creamy sauce that would be perfect for mixing with a wide pasta noodle.  After a bit of research, I came up with a recipe that I thought was worth trying out.  I have to say, the end result was a hearty, easy summertime meal that I will be making time and again.

Pasta with Roasted Garlic Pesto
I made fresh pasta to go with the sauce, but you certainly don't have to.  A store-bought fresh pasta like a linguini would be great or even ravioli or tortellini.  You could even used dried linguini.

1 head garlic
2 cups packed basil leaves
1/4 cup olive oil
1/3 cup parmesean cheese
1/4 cup pine nuts
1/2 tsp salt
freshly grated black pepper to taste
3/4 cup heavy cream
1/2 lb dry pasta or enough fresh pasta for 4 servings

Pre-heat your oven to 400 degrees.  Cut the top of the head of garlic off (about 1/4 inch) so that the tops of the cloves of garlic are exposed.  Lay the garlic in a square of aluminum foil and drizzle with a bit of olive oil.  Fold the foil around the garlic and put the package in the oven.  Roast for 30-40 minutes, until the cloves are soft and golden.  Set the garlic aside to cool.

In a food processor or blender, put the basil, olive oil, parmesean cheese, pine nuts, salt, and pepper.  Squeeze the garlic from the head into the rest of the ingredients.  Blend until smooth.

Bring a large pot of water to a boil.  Generously salt the water then add the pasta.  Fresh pasta will only take a few minutes, so be ready with another large saucepan to make the sauce.  In the saucepan, bring the cream to a simmer then add the pesto.  Warm through, but do not let the sauce boil or the cream will break.  When the pasta is done (follow package directions), drain it and add it to the saucepan.  Stir to combine and serve with additional cheese as desired. 

As my Nana would say, mangia!

Tuesday, June 14, 2011

Swiss Chard Gnocchi

Pasta is a staple here in our house.  Naturally, growing up in an Italian family, we had it at least once a week.  And that's still how it is around here.  It's simple and quick to make and everyone likes it.  But most people don't make their own pasta- why would they?  These days, you can buy great dried and fresh pasta in most grocery stores so there's almost no need to do it yourself (notice I said almost).  My Nana had a few specialties that she made by hand, and those were always the requests when it came to special  family dinners.  Not much can beat a big plateful of her ricotta cavatelli (they're like gnocchi, but made with ricotta instead of potatoes).  Some of my earliest memories are of standing on a stool next to her in the kitchen helping her roll them out with the special ridged tool she had.  My son loves to use that tool to help me make the cavatelli, too.  So, clearly, making pasta holds a special place in my heart.

Most people (if they've even heard of gnocchi) think that it's a fancy pasta that you can only get in restaurants.  They do sell a packaged version in many grocery stores now, and they're okay, but nothing can compare to making them at home.  Maybe you've watched "Top Chef"-one of my faves- and saw Fabio (yum!) make his Nonna's gnocchi several times.  If he can do it with absolutely no modern kitchen tools, you can do it at home, I promise.  The gnocchi recipe I'm presenting here is a great platform for as many spin offs as you can think of.  Swap the swiss chard for spinach (or any other leafy green for that matter).  Use sweet potato or butternut squash instead of the russet potato.  Vary the sauces.  You get my drift, right?

Swiss Chard Gnocchi
Adapted from Epicurious
1 pound russet potatoes (about 2 large)
1 large egg
1 tbs olive oil
1 3/4 cups all-purpose flour
1 1/4 pounds swiss chard, stems and ribs removed

Steam potatoes until very tender, about 50 minutes.  Let them cool enough so you can handle them and then peel the potatoes.  In a large bowl, mash the potatoes well.  Meanwhile, bring two inches of salted water to a boil in a large pot.  When the water comes to a boil, add the swiss chard and cook until wilted, 3-4 minutes.  Drain the chard well and squeeze out any extra water (you don't want soggy gnocchi).  Chop the chard finely.  Mix the chard into the potatoes and add the egg and oil.  Gradually stir in the flour until you have a soft, slightly sticky dough.
Cutting the gnocchi

Lightly flour a baking sheet to act as a landing pad for the finished gnocchi.  With lightly floured hands, gently roll about 1/4 cup of the dough into a 12 inch long roll about 3/4 of an inch in diameter.  Cut the rope into one inch pieces.  You can shape the gnocchi further by gently taking each piece and rolling it into a slight oval, but the shape is just fine as is.  You don't want to overwork the dough or they will be tough, so work with gentle and light hands.  Place the gnocchi on the floured baking sheet and repeat with remaining dough.

The shaped gnocchi
Bring a large pot of water to a boil.  Add a big pinch (about a tbs) of salt to the water, then gently place the gnocchi into the water.  You've got to be careful with them, they are soft and you don't want them to fall apart.  Once all the gnocchi are in the pot give them a stir and then leave them be.  When they raise to the top of the water, which takes 3-4 minutes,  they are cooked.  Gently lift them out with a slotted spoon and put them right into a pot of tomato sauce.

What kind of tomato sauce?  Well, I really don't follow a recipe.  The easiest and tastiest sauce you can make is to saute half of an onion in some olive oil in a large saucepan for a few minutes.  Then add a can of good Italian tomatoes and let them simmer for 15-20 minutes.  At the last minute, add some chopped basil.  That's all it takes.  My husband would say that adding some crumbled Italian sausage to saute along with the onions would make it even better (and in the case of this gnocchi recipe, I might be inclined to agree with him).  In any case, serve the gnocchi and sauce with some grated cheese.   I prefer pecorino romano, but parmesean is good too.  Oh, and some good bread to soak up the extra sauce.  Mangia!