You know, it's funny. Life, that is. Sometimes you cruise right through it barely noticing the change in time and day. Just one moment into the next with your head down missing the details, the ups, the downs. And then something unexpected stops you in your tracks and forces you to look around.
This is the story of my life as of late. Just kind of going through the motions, each day passing pretty much the same as the rest. Not in a bad way, but in a less-than-present sort of way. And then two little things that don't amount to much in the grand scheme of life nearly took my breath away. Those two little things, really not much more than a few sentences spoken both by people who know me and by those that don't, made me look deep inside and as a result of that introspection to see the world around me in a much different way. I'm grateful. It feels good to appreciate the people around me more fully and perhaps even take care of myself with more purpose.
Am I being a bit too cryptic for you? If I am, you have my deepest apologies. It's simply that I'm not quite sure what the end result of those few sentences swirling around in my mind will be. I need a bit more time for that. But in the meantime, I'll share a few of those words with you. Because they made me stop and catch my breath and it's my hope that they might just do the same for someone else.
"You are brave enough. Don't ever think otherwise."
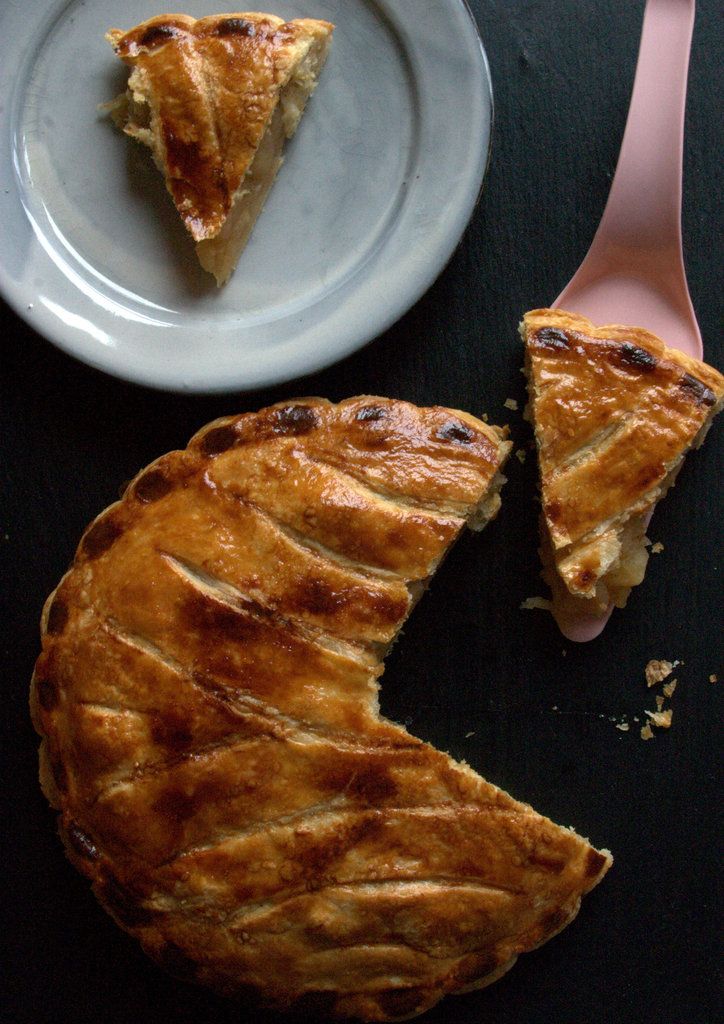
Apple Galette des Rois
Makes 1 9-inch galette which will serve 4-6 people. Rough puff pastry recipe from in jennie's kitchen.
For a printable version of the recipe, click here.
Not too long ago my sister and I were standing at the counter of a French patisserie ordering pan au chocolat (chocolate croissants) and eclairs when I noticed this beautifully bronzed pastry that I had no name for. The two of us wondered aloud at what it could be, but were happy to buy our croissants and eclairs and be on our way without too much thought. A couple of weeks later that same pastry appeared in my Instagram feed (from Jennifer Perillo of in jennie's kitchen) and I learned that what we had seen was called a galette des rois and it is a pastry made in France only once a year for the celebration of Epiphany. I was intrigued by the pastry and even more so when I read through Jennifer's post and saw that she had made her own puff pastry for the galette. My visions of puff pastry were of huge blocks of butter and a long, tedious process. Jennifer's recipe was a revelation to me. So simple- 4 ingredients, a bit of rolling and chilling and I had puff pastry better than any I could buy in a store. It's a game changer. The rest of the galette process was just as simple having decided on making an apple filling instead of the usual almond one since my people aren't nut people. In my house, this galette will be a year-round treat instead of being reserved to once a year, that's how much we love it.
Rough Puff Pastry
1 2/3 cup ( 250 g) all purpose flour
1 tsp fine sea salt
12 tbs (125 g) unsalted butter, at room temperature and cut into cubes
2/3 cup (150 mL) cold water
Place the flour and salt into a large bowl and give them a quick mix. Toss the butter pieces into the flour and, using your finger tips, blend the butter and flour together until you have a crumbly mixture with some marble-sized pieces of butter remaining.
Stir the water into the flour-butter mixture with a wooden spoon until it just comes together into a dough. Turn the dough out onto a lightly floured work surface and gently form it into a rectangle. Working in one direction (left to right or top to bottom, for example) roll the dough into a long rectangle that is roughly 3 times longer than what you started with. Fold the dough in thirds (fold one end towards the center and then fold the remaining third over the top) so that it resembles a folded letter.
Give the dough a quarter turn and repeat the process, rolling out the dough into a long rectangle and then folding it like a letter. Wrap the dough in plastic wrap and refrigerate for 30 minutes.
Apple Filling and Finishing the Galette
1.5 lbs apples (3 medium apples), your favorite cooking apple
3 tbs light brown sugar
1/3 cup water
1 tsp vanilla bean paste or 1/2 vanilla bean, split and seeds scraped out (optional)
1 recipe rough puff pastry from above
1 egg yolk, beaten with a splash of milk
While the dough is chilling, make the filling.
Peel, core and chop the apples into 1 inch chunks. Place the apples, brown sugar, water and vanilla bean (if using) into a medium saucepan. Bring to a simmer over medium heat. Cover and lower the heat to medium-low. Cook, stirring occasionally, for about 15 minutes or until the apples are soft but haven't completely broken down (you want some texture in the filling, not applesauce). Give the apples a light mash with a fork and set aside to cool.
Preheat your oven to 375 F (190 C). Line a baking sheet with parchment paper.
Remove the chilled dough from the refrigerator. Cut it in half and return one half to the refrigerator. Place the other half on a lightly floured work surface. Rolling in one direction again, roll from one edge to the opposite edge. Give the dough a quarter turn and repeat the process of rolling in one direction edge to edge. Continue giving the dough a quarter turn and rolling until the dough is just larger than an 8 inch plate or round baking pan. Using a sharp knife, cut around the edge of the plate or pan and place the circle of dough onto the prepared baking sheet.
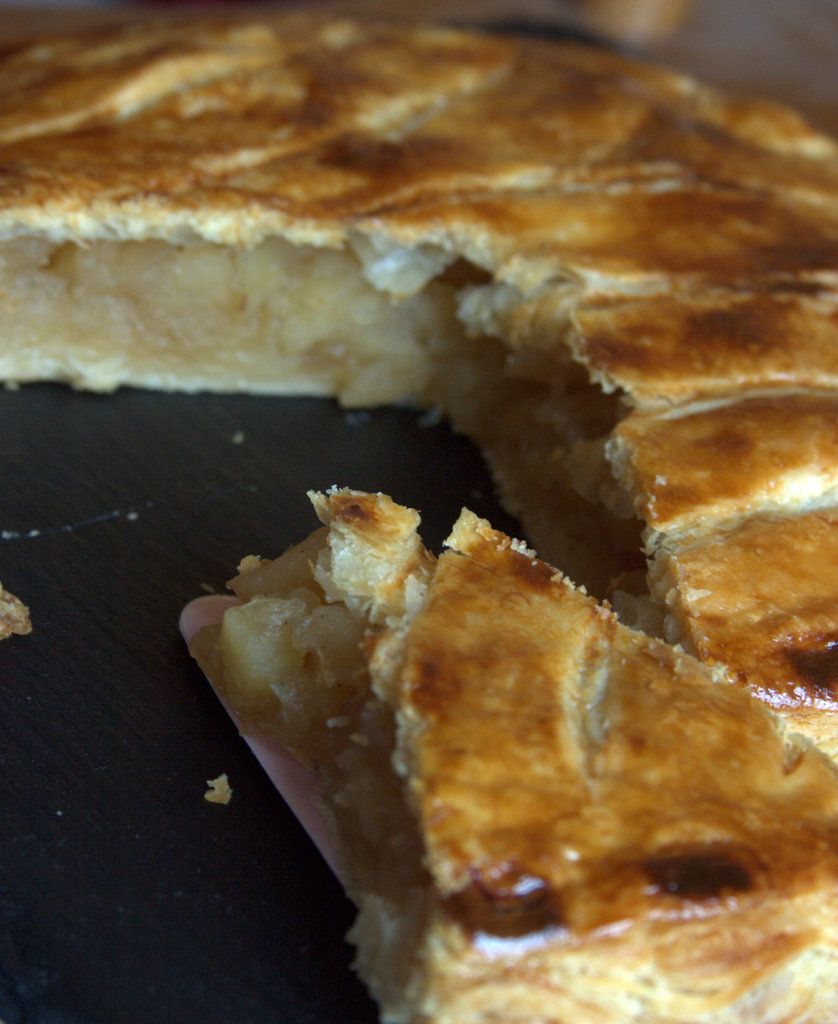
Spread the cooled apple filling over the dough, leaving a one inch border clear of filling all around the edge. Remove the second half of dough from the refrigerator and roll and cut it in the same fashion as the first half. Place the second circle of dough over the filling and gently but firmly press the edge down so that it adheres to the bottom circle. With the tip of a sharp knife you can score a design across the top (but don't cut all the way through the dough!). Pierce a few holes for steam to escape. Brush the top of the dough with the egg yolk.
Bake the galette for 30-35 minutes until puffed and golden brown. Let the galette cool and serve warm or at room, temperature.