Showing posts with label Desserts. Show all posts

Saturday, April 9, 2016

Buttermilk Cupcakes


I'm going to exercise all of my patience, good nature and positivity today.  It's imperative.  Because if I give in to the "dark side" of my mood things can go very bad, very quickly.  (Can you tell I just watched the newest Star Wars?)

There are some big wheels turning right now that determine the future of my family and they are just turning WAY TOO SLOW for my liking.  It's time for the next big move thanks to the Navy and we know where we are going but the when, how and how frustrated we will be along the way is still up in the air.  The simple act of moving is difficult as it is but throw in three kids, an international move, moving our furnishings into storage, passports, visas and a month in the States in between and you can see how I might be just the tiniest bit stressed.


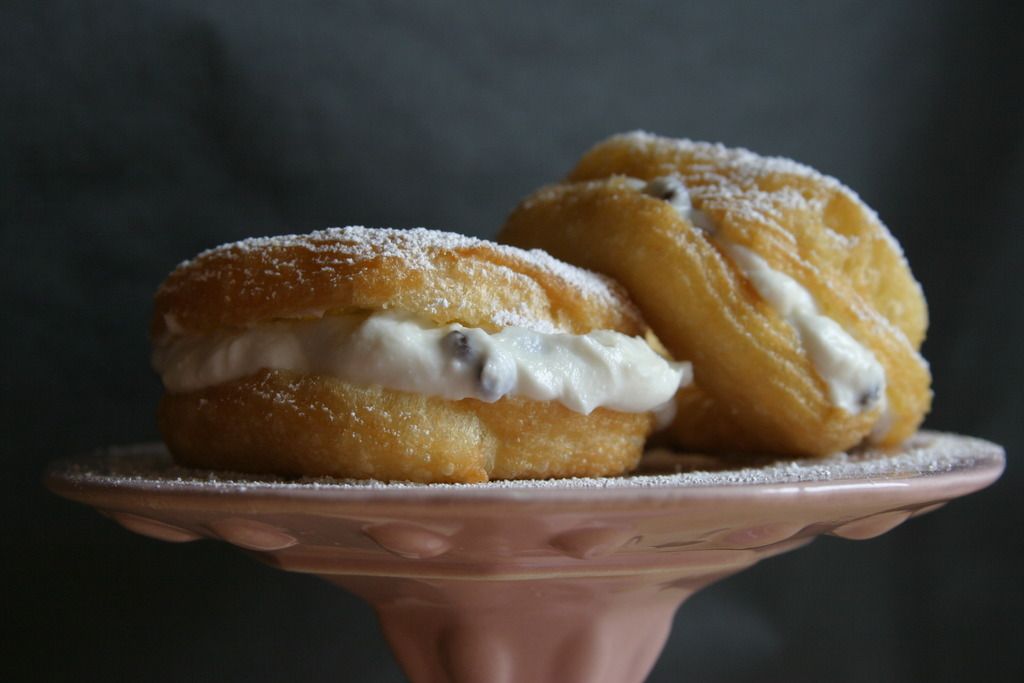
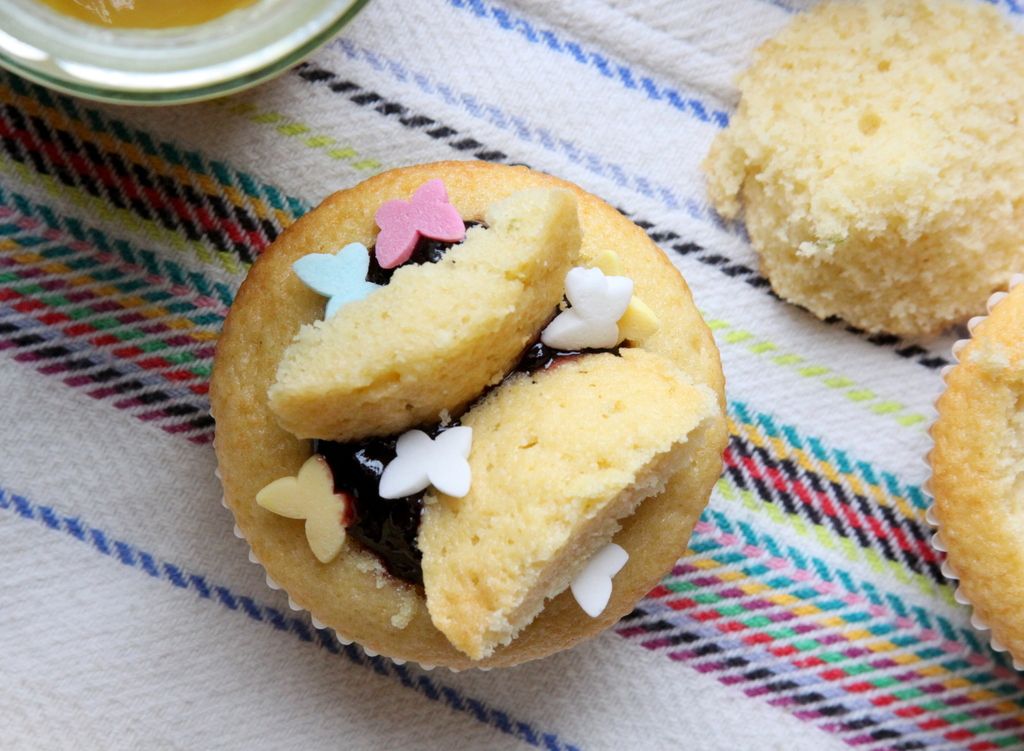
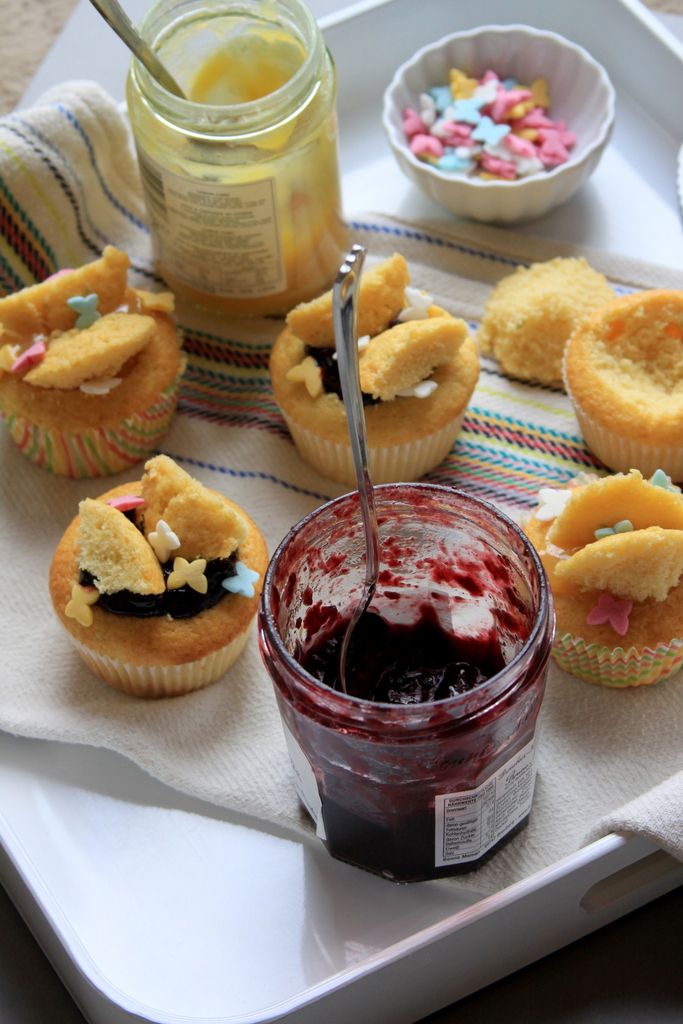
So instead over obsessing over things that are completely out of my control, I'm making cupcakes.  Simple, light, vanilla scented ones.  I've made these a few times recently and I'm happy to say that they always turn out just right and are easy to play with if you want to go beyond basic.  The first time I baked them I made these sweet little butterfly cupcakes like my Nana used to make.  You just cut a cone-shaped piece of cake from the top, fill the hole with something delicious (I used jam and lemon curd this time, but Nana used to use pastry cream), slice the cake cone in half and nestle it in the filling to look like butterfly wings.  My kids loved them and I was reminded of hanging out in Nana's kitchen as a little girl.  If anything was going to make me forget a mountain of stress, that was it. 

Thanks, Nana.


Buttermilk Cupcakes
Makes 1 dozen standard cupcakes.  Adapted from this recipe by Martha Stewart.
For the printable recipe, click here

This is a simple, basic cupcake that you can do in one bowl by hand without having to pull out (or clean!) a big mixer if you don't want to.  It just takes a little elbow grease to whisk the eggs and sugar but it's totally do-able.  That kinda makes it perfect in my book.  The other bonus with this cupcake is that you really can leave it simple or jazz it up any way you want.  I've made them with mini chocolate chips for a birthday topped with buttercream and left them plain for a quick treat.  Add some lemon zest and blueberries, warm spices like cinnamon or cardamom or even bits of toffee or nuts to make them completely special and different.  What you do with the cupcakes is up to you but they are bound to become one of those recipes you keep coming back to time and again.

2 large eggs, room temperature
2/3 cup sugar
1 cup all purpose flour
1 tsp baking powder
1/3 cup buttermilk
4 tbs butter
1/2 tsp vanilla extract

Preheat your oven to 350 degrees.  Line the cups of a standard cupcake tin with cupcake liners.  Set aside.

Place the eggs and sugar into the bowl of an electric mixer.  Whisk on medium high until the mixture has thickened, lightened in color and forms ribbons on the surface that hold for a few seconds before disappearing. (Alternately, you can do this by hand with a whisk and a large bowl).  Reduce the speed to low and slowly add in the flour and baking powder.  Mix just until incorporated.

In a small saucepan, warm the buttermilk and butter just until the butter melts.  With the mixer on low, slowly add the buttermilk/butter mixture to the batter until it is smooth.  Add in the vanilla and mix until just incorporated (if you want to add anything to the batter such as chocolate chips or berries, add them now).

Divide the batter evenly among the prepared cupcake cups.  Bake for about 15 minutes, or until the cupcakes are lightly golden on top and the tops spring back when pressed gently and a toothpick inserted into the center comes out clean.  Let the cupcakes cool in the tin on a wire rack for about 10 minutes.  Remove from the tin and cool completely on the rack.  Cupcakes can be stored in an airtight container for up to three days at room temperature.


Friday, March 18, 2016

Saint Joseph's Cakes {Nana's Recipe}


A few years ago my mom sent my sister and I a message asking us what recipes we'd really love to have from when we were kids that she and our grandmother had made for us.  We sent back a whole list of recipes, things that we rarely make ourselves and some that have become staples, that were the day to day must haves from our childhoods.  There were pasta and bread recipe requests as well as the cakes and cookies that were the highlights of family meals and celebrations.  Clearly, Mom had a plan to do something with this list of favorites.  But I think life got in the way and she was never able to do what she had hoped to.


Fast forward a year and I was growing weary of asking Mom for the same recipes over and over again (Why did I not write that down?  Where did that one go in the latest move?).  Plus, I was pregnant with my third baby and eager to get family recipes all in one place so that I could pass them on to my children.  So I made a determined effort to get all of the important baking recipes from my Mom and she and I collaborated in putting together a collection of recipes and stories in one book.  When we made our list of recipes to include, there were some that were absolutely non-negotiable.  Mostly these were the recipes from my Nana that came from Italy and would be completely lost of we didn't make the effort to write them down now.  This "cake" was one of them.

Nana made these cakes every year for St. Joseph's Day, a holiday that is celebrated in her Italian home region on March 19 every year.  They were one of my absolute favorites growing up- a sort of doughnut/French cruller stuffed full with sweet ricotta and chocolate chips.  It was one of the first that I made on my own for my college roommates and even for my students every year when I was teaching.  Now my own children love them and ask for them from time to time.  There was no way that I was going to leave this treat out of our collection.  I did a bit of streamlining of the ricotta filling recipe, but other than that this recipe is all Nana.  I wouldn't have it any other way.


Saint Joseph's Cakes
Makes at least one dozen 3 inch cakes.
For the printable recipe, click here.

These pretty little cakes are very much like a fried cream puff.  Keeping that in mind, they don't do too well after about a day.  So plan to eat them or share them all the day they are made.  Don't fill them until you are ready to serve or they will become too soggy.  The filling is the same as you would use to fill a cannoli so any leftover can be used to fill bought cannoli shells or even baked cream puffs (or if you are like me, straight off the spoon standing in front of the fridge).

½ cup neutral-flavored oil                                   
1 cup water                     
Salt
1 cup pastry (or all-purpose) flour
1 tbs sugar    
4 large eggs                                           
½ tsp each grated lemon and orange rind

Also: Neutral-flavored oil for frying
Chocolate Chip Ricotta Cream (recipe follows)
Powdered sugar for dusting the tops

 Cut several squares of parchment paper into 4 inch squares.

Combine oil, salt, and water in a saucepan. Bring to a boil. Add flour all at once and mix well with a wooden spoon until the dough leaves the side of pan. Remove from the stove and let it cool off a little.  Add eggs, one at a time, mixing well after each addition. Add sugar, grated peels and mix well again.

Heat oil in a large pan that’s about 4 or 5 inches deep.  Fill a large pastry bag fitted with a large star tip with the mixture. On each square of parchment paper, pipe out a 3” circle of dough. When the oil starts to shimmer on the surface drop the parchment with the dough circles into the oil. The paper will come off in a few seconds and you can remove it. Fry until golden brown, flip, and fry until the other side is golden. Let cool completely.

Slice in half and fill with chocolate chip ricotta cream.  Dust with powdered sugar.

Chocolate Chip Ricotta Cream
2 3/4 cup ricotta
3/4 cup powdered sugar
1/4 cup mini chocolate chips
1 tsp vanilla extract
1 tsp finely grated orange zest
1/2 tsp fresh orange juice

Line a fine mesh sieve with a layer of cheesecloth and place over a bowl.  Put the ricotta into the sieve and place the whole thing into the refrigerator to drain overnight (covered with plastic wrap).

In a large bowl, whip the drained ricotta and powdered sugar with a wooden spoon or spatula until fluffy.  Beat in the chocolate chips, vanilla, orange zest and juice.  Refrigerate, covered, at least one hour or until ready to use.


Friday, March 4, 2016

Orange Olive Oil Polenta Cake


I'm trying to shake off the gloomy mood around here.  Reading back over my posts as of late, I feel like I've been in a kind of funk and it shows.  So I'm purposefully taking on a decidedly more positive tone today.  Let's see how it fits, shall we?

I reconnected with an old high school friend not too long ago.  She's been through some rough stuff in her life, including some very devastating losses.  But she's the most positive person and I'm always looking forward to reading the things she posts on Facebook and scrolling past the inspirational quotes she finds on Instagram.  Yup, she's one of THOSE people.  Perpetually happy and trying to make the world a better place, one inspirational quote at a time.  We all know someone like that, don't we?  On our worst days we roll our eyes and scroll quickly past.  On our best we think, "Yes!  That's exactly how I feel!". 


A few days ago my friend posted this little gem,

"'It's impossible,' said pride.
'It's risky,' said experience.
'It's pointless,' said reason.
'Give it a try,' whispered the heart."

It's the kind of thing that's layered on top of a photo of a mountain climber or amazing landscape that I usually don't even bother looking at.  But that day I did.  I suppose I was feeling optimistic and it struck a chord with me.  You see, I had done just the thing about a week earlier.  I had put myself out there to be scrutinized and (hopefully) accepted in a role that would take my work to another level.  It was a move very far outside my comfort zone and had required an almost "close your eyes and go for it without thinking too much" sort of move to make it happen.

 
The same day that quote rolled across my screen I got the email saying that although they had enjoyed working with me in the past, there was no room at the moment for me to contribute.  Included in the email was an offer for me to do a bit of behind the scenes work in lieu of the position I was hoping for.  Which is sweet and I'm happy to do anything that will get my foot in the door, but at it's heart it was still what I had dreaded most- rejection.  It's the greatest leap of faith in yourself and your abilities to risk rejection in that way.  My leap, it seems, fell just that short of making it to the other side.

The funny thing is, I'm okay with that.  It was risky, but not impossible or pointless.  I listened to the whispers of my heart and tried.  I think that's win.  Maybe not the win that I was hoping for, but better than giving in to fear and not having tried at all.  It's what I try to teach my kids and what I aimed to instill in my students when I was still in the classroom- getting something wrong or failing is not the worst thing that can happen.  In fact, those moments teach us the best lessons about ourselves and about how to improve for the next time.  Because there will be a next time, you can be sure of it.  So this time, my aim was off a bit.  Next time? Who knows?


Orange Olive Oil Polenta Cake
Makes one 9 x 5 inch loaf.  Adapted from smitten kitchen.
For the printable recipe, click here.

I love this sort of one bowl, quick and easy cake to have around for an afternoon snack or if a friend drops by.  Wrap a sheet of parchment and pretty ribbon around one and you've got a wonderful hostess gift.  The orange (I used sweet cara cara oranges, but blood oranges or valencias would be just as at home here) gives a bright, citrus-y sweetness, the olive oil a bit of depth and the polenta adds just a hint of crunch to the bite that I find irresistible.  The polenta or corn meal that you choose will change the texture depending on how finely ground it is.  The one that I used is a nice happy medium and it suits this cake just fine.  This is a chance to break out that good olive oil you've been saving- with as much as is in the cake you will taste the difference.

1 cup (200g) cane sugar 
3 oranges
1/3 cup buttermilk or plain yogurt 
3 large eggs 
2/3 cup good quality extra virgin olive oil 
1 cup all purpose flour 
3/4 cup ground polenta or corn meal 
1 1/2 tsp baking powder
1/4 tsp baking soda 
1/2 tsp fine sea salt

Butter a 9x5 inch loaf pan and set aside.  Preheat oven to 350 degrees. 

Place the sugar in a large bowl.  Zest one of the oranges over the bowl directly into the sugar (the orange flavor in this cake is subtle, if you'd like to make it more pronounced grate the zest of a second orange into the bowl).  Rub the zest into the sugar with your fingertips to release the oils.

Remove the peel and pith of one orange (supreme the orange) by cutting off the top and bottom to reveal the fruit inside.  Then, run your knife along the curve of the orange to remove the remaining skin and pith.  Holding the orange in your hand, cut away the wedges of orange between the membranes.  Drop the orange pieces into the bowl with the sugar and zest.  Break up the segments into 1/4 inch pieces with your fingers.

Juice the remaining two oranges into a small bowl or liquid measuring cup. You should have about 1/2 cup of juice.  Stir the buttermilk into the juice then pour it into the bowl with the sugar mixture.  Stir the mixture together with a whisk.  Add the eggs and olive oil to the bowl and whisk until fully combined. 

Carefully whisk in the flour, polenta, baking powder, baking soda and salt into the wet ingredients just until incorporated.  Pour the batter into the prepared pan and place in the oven. 

Bake for 50-55 minutes.  The cake will be golden and a knife or toothpick inserted in the center will come out clean.  Cool the cake on a wire rack for 5 minutes.  Run a palette or butter knife around the edge of the pan and invert the cake onto the rack.  Cool completely (right side up).  Wrapped airtight the cake will keep for three days.


Tuesday, October 27, 2015

Mom's Chocolate Pear Upside Down Cake


Tradition [truh-dish-uh n] noun : 1. the handing down of information, beliefs, and customs by word of mouth or by example from one generation to another without written instruction 2. characteristic manner, method, or style


I've been struggling with this post, which is why it has taken so long to arrive in this space.  I keep sitting down to write and coming up blank.  I love this recipe, I love its origins and what it has become.  So what's the problem?  And what does that have to do with the definition of tradition that I wrote above?  Both valid questions.


The thing is, I really don't know.  I can guess, sure, but it's not clear to me yet what the block is about.  Too many things to list here, I suppose- maybe in a future post.  Probably all boiling down to life, kids, responsibilities.  You know, the stuff that distracts from really living fully.  Buuuuut...... I try not to make this blog a personal diary so much as an exploration of the thoughts that run though my day with enough frequency to make them relevant.  It's not a true confessions page though.  So lets keep it lighter, shall we?  

In the meantime I'm trying to overcome my blogging block by going back to my roots.  Which always leads me to my Mom.  Hence the nod to tradition referenced earlier.  The cake I'm offering up today is one of those cakes that I can remember her making since I was a small child.  She grabbed the recipe from a magazine long ago and it was one of those total 70s recipes.  Canned fruit, maraschino cherries, you know the kind.  She did away with the cherries from the start but pretty much stuck to the recipe otherwise.  I thought I might take it a step further (and kick tradition to the curb, if you will) and modernize it just a bit more.  So gone is the can of sugar-laden fruit; replaced instead by gently poached pears who's poaching liquid is also used to make the caramel-ly goodness that is characteristic of an upside down cake.  It's a nod to tradition without being strictly traditional.  And maybe just the thing to kick my blogging butt out of its funk.


Chocolate Pear Upside Down Cake
Makes 1 8x8 inch square or 9 inch round cake.
For the printable recipe, click here.

This update of my Mom's classic is enhanced with poached pears but its still a simple cake at heart.  If you don't have time to poach your own pears, by all means use pears canned in their juices (not in syrup!).  The recipe has pecans in the ingredient list but you won't see them in my photos because my little family doesn't appreciate them.  So I guess they're optional but really great if you have them.

For the pear topping:                   
1/4 cup (4 tbs) unsalted butter           
1/2 cup packed brown sugar               
2 tbs pear poaching liquid                

4 poached pear halves (recipe to follow)                       
1/4 cup coarsely chopped pecans           
                       

For the cake:
1 1/4 cup sugar    


1 1/2 cups all purpose flour                        
1/4 cup cocoa powder
1/2 tsp baking soda
1/2 tsp salt
10 tbs softened butter
1 tsp vanilla extract
2 eggs
1/2 cup buttermilk

Preheat oven to 350 degrees.

Melt the 1/4 cup of butter and pour it into a 9 inch square cake pan.  Drizzle the corn syrup over the butter and then sprinkle the brown sugar in the pan. 

Cut the pear halves into 4 equal portion lengthwise and arrange the pieces in a sunburst pattern over the mixture in the baking pan.  Sprinkle the chopped pecans around the pears.

Sift together the flour, cocoa powder, baking soda and salt.  Set aside.

In a large mixing bowl (fitted to a stand mixer or with a handheld mixer with beaters attached), beat together the butter, sugar and vanilla until light and fluffy.  Add the eggs one at a time, beating fully between additions.  Add the dry ingredients alternately with the buttermilk in three additions.  Mix until thoroughly combined.

Pour the batter into the pan gently so as to disturb the pattern of the pears as little as possible.  Bake for 45-55 minutes, until a toothpick inserted into the center of the cake comes out clean of batter or very wet crumbs.  Cool the cake for about 5 minutes and then run a knife around the edges of the pan to loosen.  Invert the cake onto a serving platter.  Cut into squares.


Poached Pears
2 ripe but still firm pears
1 quart water
1/2 cup honey

Stir the water and honey together in a 2 quart pot.  Bring the mixture to a boil over a medium heat.  In the meantime, peel, quarter and core the pears.

When the water/honey mixture comes to a boil add the pears.  Turn the heat down to medium and simmer the pears for 20-25 minutes or until the tip of a sharp knife easily pierces the pears.  Remove the pears from the poaching liquid and cool making sure to reserve 2 tablespoons of the poaching liquid.

Pears can be stored in the cooled poaching liquid in the refrigerator until use.


Thursday, July 30, 2015

Friday, May 29, 2015

Blueberry and Rhubarb Crumble


I realized that I just missed the 4th anniversary of my little blog!  How on Earth I didn't realize it or find it important enough to mark the occasion, I do not know.  Plus I've let nearly a month go by without a post.  What, oh what, is happening here?

Wednesday, May 6, 2015

Black Tea Affogato with Cocoa Nib Brittle


I don't know how other food bloggers do it.  How do they keep posting week after week through moves, babies, book deals, the ups and downs of life?  I used to be like that, in fact I used to post almost twice a week.  We lived in sunny, warm Southern California when I started this blog.  Ingredients and inspiration were abundant.  I was part of a CSA that dropped a mountain of beautiful produce in my lap every week and a garden in my yard that allowed me to grow our favorites nearly year round.  I had two kiddos who were old enough to be in school at least a few days a week so I had time to fiddle around, try new recipes and ingredients.  It all seemed so easy.  I'm coming up on four years now and these days I'm lucky if I can get two posts a month cranked out. I can't remember how I used to manage it.  Was it just that I had more time?  More ideas or inspiration?  Am I (and this is the worst possibility) simply burned out?


I'm trying not to put too much pressure on myself.  2015 may just turn out to be a year of slim pickings here and I am trying to be okay with that.  Last year was a big, big year for me.  I kept on blogging through a surprise pregnancy, working on capturing my family's recipes in a little cook book of my own and recipe testing for an awesome cookbook that will be out later this year (I can't wait to share the results with you!).  So I suppose it's only natural that I need to take a step back this year.  That's not to say that I don't want to keep at it.  I have a half dozen ideas swimming around in my head pretty much all the time.  It's the steps of taking those ideas from the musings of my daily life to actual recipes and photos that I can share with you.  So I'm trying to make what does get onto this page the best of what makes it onto my plate.  My hope is that even if it's not abundant, what I do post is worth your time and mine.


Black Tea Affogato with Cocoa Nib Brittle
Serves one with enough brittle to share with 3 friends.
For the printable recipe, click here.

I love tea.  It's that simple.  It's my comfort and my morning drink.  So it stands to reason that I use it a lot in my cooking and baking too.  If you look through my archives you'll find at least half a dozen that incorporate tea in some way.  So when I saw a recipe using chai (a personal favorite) in place of the usual espresso in the Italian treat affogato (coffee poured over ice cream) I decided that I need to give it a shot.  I broke out my really good loose leaf assam tea, steeped it and gave it a shot.  But it needed a little something else.  A crunch and counter balance to the sweet ice cream and bitter tea.  I recalled an ice cream cake I once saw that included a cocoa nib brittle and remembered thinking that I really wanted to give it a try, so this is my version simplified.  Since the serving is small, use the best ingredients you can.  The creamiest and richest vanilla ice cream and your favorite strong black tea will turn this simple treat into something special.

For the tea:
1/4 cup hot water
1 bag black tea (assam, darjeeling, jasmine or English breakfast) or 1/2 tsp loose leaf tea

For the cocoa nib brittle:
3 tbs sugar
1/4 cup cocoa nibs

Premium vanilla ice cream

Steep the tea bag in the hot water until it cools to warm.  If using loose tea, use a tea infuser to contain the leaves.  You want a strong tea to counter balance the sweet ice cream so infuse as long as you can.  If it cools too much you can always reheat it to warm.  Don't reheat the tea too much, too hot and it will simply melt the ice cream right away.

While the tea is infusing, heat the sugar in a small dry pan over medium high heat.  It will melt and caramelize it in just a few minutes.  Watch carefully because the sugar can go from perfectly caramelized to burnt and bitter in a heartbeat.  If it needs a stir, do so gently and little as possible so that the caramel doesn't crystallize.  Once it gets to a beautiful golden color, remove the caramel from the heat and stir in the cocoa nibs.  If it cools too quickly you can put the pan over the heat for just a moment to soften the caramel.  Pour the brittle onto a parchment lined baking sheet to cool.  Once it cools, break into small pieces.  The brittle will keep in an airtight container for a few weeks.

Assemble the affogato by placing two or three small scoops of ice cream into a glass.  Pour the warm tea over the ice cream and top with a sprinkling with the brittle.  Enjoy immediately.


Wednesday, April 15, 2015

Grain and Dairy Free Chestnut Flour Brownies


I feel spectacularly lucky to be living in Europe with my family.  The opportunities to experience the cultures and explore the history of this continent are the stuff of dreams for most people.  And we get to live that dream.  I spend a lot of time trying to photograph and document all of our travels and even the moments that have become commonplace for us because of living here.  My goal is to have a physical reminder of all the things we have seen and done so that my children will be able to hold onto the memories that they have made here.  I'm pretty confident that my oldest will be able to remember some of the highlights on his own, but at 6 years old Wyatt probably will only be able to retrieve bits and pieces if he's lucky.  And the baby has no idea that she isn't actually European, so photos of her in the incredible places she's been will be like looking at some other person's life when she flips through them in a few years.


To me, it's those memories that are the most important to take away with us from this adventure.  Much more so than any souvenir that will be stuck on a shelf or broken within days of buying it.  They will build my kids into the adults that they will be one day (sooner than I am ready for!).  I know for sure that mine have influenced my personality in so many ways.  We didn't take fancy vacations, we just didn't have the money for that.  So the memories that influenced me the most are of the times I spent in the kitchen with my mom and grandmother.  My skills are only so good because of the experiences that I was allowed to have alongside those two women.  To say that my most influential memories are all about food is an understatement.  In fact, even what I can recall from the few vacations that we did take is food.  Salty, delicious Virginia ham and Death by Chocolate in Colonial Williamsburg, anyone?  Or maybe catching crabs and eating pizza and boardwalk fries at the Jersey shore?


Recently, my mom has been struggling with some health issues and has been forced to reevaluate the way that she eats as a result.  She hasn't been able to eat many of the wonderful foods that she and my grandmother taught me how to make as a child.  I can't imagine how difficult it must be to have the memories of the pastries, cakes, and breads that she knows so well and not be able to eat any of them.  When we visited back home just last week we had a big family gathering.  After making cakes, cream puffs, breads and lemon bars for days, my mom had to just sit by and watch everyone else eat them.  As the guests started to leave and only close family was left lingering and chatting she asked me to make these for her.  Just a little pleasure in a moment when there were so many things she had to stay away from.  It was, of course, the least I could do for the woman who's lessons made me the person that I am.  I had been tinkering with a recipe that includes none of the things she has to stay away from but is still the comfort food she longs for.  I'm thrilled that by the end of that evening, I was able to present these brownies to her and hopefully, create another one of those memories that stays with you for a lifetime.


Grain and Dairy Free Chestnut Flour Brownies
Makes 12 brownies.  Adapted from Fig Jam and Lime Cordial.
For the printable recipe, click here.

I found chestnut flour in a natural food store recently and decided to give it a try.  It's so different from the other nut flours I've used before.  Unlike the grainy texture of almond or hazelnut flour, chestnut flour is silky and really feels like wheat flour.  It's a bit on the expensive side, but in this recipe a little goes a long way.  One bag will last quite a while if you care for it (like other nut flours, it stays the freshest when stored in the freezer).  In this recipe it really does well and helps give the brownie structure without imparting an overly nutty flavor.  The other new ingredient for me was coconut oil.  Admittedly, I cannot stand coconut.  So I was definitely hesitant to give it a go, but there really is no other good substitute for butter in a recipe like this except maybe vegetable oil.  I have to say that the coconut oil ended up doing a good job.  And while there was a slight aroma of coconut, I was happy that I couldn't taste it at all in the finished brownie.  Success.

5 tbs coconut oil
1 1/3 cups (8 oz) 60% cocao semisweet chocolate chips
2/3 cups cane sugar
1 tsp vanilla extract
2 eggs, room temperature
1/4 cup chestnut flour, sifted

Preheat your oven to 350 degrees.  Line an 8x8 inch baking pan with parchment paper.

In a large saucepan over medium heat, melt the coconut oil.  Once the coconut oil is melted stir in the chocolate chips and remove from the heat.  Stir the sugar into the chocolate mixture and then add the vanilla and eggs.  Stir until all are well combined.  Then add the chestnut flour and stir vigorously.  The batter will appear slightly curdled at first.  Keep stirring and you will see and almost magical transformation into a thick, smooth batter.  Pour the finished batter into the prepared pan.

Bake for about 20 minutes or until the top appears to have dulled in shine just a little bit and the center is just barely set.  Cool completely and then cut into 12 squares.  The brownies will keep for a couple of days stored in an airtight container.


Friday, February 13, 2015

Honeyed Blood Orange Curd


When I lay my baby girl down on her changing table she breaks into a fit of giggles and many times the giggles turn into a full on hearty, belly laugh that doesn't stop until we're done.  I can't imagine for the life of me what is so funny about diaper changes, truly.  But whatever she imagines causes this moment of pure joy that is so infectious, no matter what my mood is I can't help but join in the merriment.  It's such pure and unadulterated happiness, so simple and sweet with nothing held back.  Those are the moments that make my Mama heart sing.


It got me thinking about moments like that in my own life.  There are plenty of memories from my childhood and silliness with my sister, unforgettable moments with my best friend from high school and my college roommates, sledding (zooming!) down a 7km Swiss road with my then 4 year old son in the blindingly fresh snow.  But what I've come to realize, sadly, is that the scales are tipped in favor of childhood.  As we get older there are fewer and fewer instances of that sort of joy.  We are either too busy to notice the moments that could spark the laughter or are too self conscious to let ourselves go the way a small child would. 


So I've vowed to myself to join in with my my sweet girl when she gets giggly.  I want to tip the scale back in the other direction.  Because joy shouldn't be limited by age. 


Honeyed Blood Orange Curd
Makes about 1 pint
For the printable recipe, click here.

This curd is really quite lovely, sweet without being overly cloying.  It's not quite as tart as a lemon curd because the blood orange is a beautifully fragrant and sweet citrus.  I hold back on the sweetener (honey in this case) to keep the orange flavor at the forefront and keep the curd from getting too sweet.  It makes a great spread for biscuits and scones, a dip for berries (if you can find any quality ones in the same season as the oranges) and fills pastries beautifully.  In this case, I made small pavlovas (a sort of flat-ish meringue) that I filled with a scoop of curd.  The result was a taste that brought me back to the days of running after the ice cream truck on a hot summer afternoon as a kid.  Talk about joy!  The curd and pavlova combination is a sophisticated dessert that is unfussy and easy to make and reminiscent of a cloud-like creamsicle.  Childhood joy for an adult palate- perfect.  The meringue recipe is not mine, so I will simply give you the link (though I use lemon juice in place of the vinegar and add a smidge more vanilla) to the recipe from The Kitchn.  Any way you use it, this blood orange curd is quite something else.

Zest of 1 blood orange
1 cup freshly squeezed blood orange juice (3-4 oranges)
1/4 cup mild flavored honey (this is a perfect time to use orange or citrus blossom honey)
2 large eggs
2 egg yolks
4 tbs unsalted butter, room temperature
1/8 tsp fine sea salt

In a small saucepan, bring the orange juice to a simmer over medium heat.  Continue to simmer the juice until it has reduced by half.  Remove from the heat and let it cool to room temperature.

Add the zest, honey, eggs, egg yolks, butter and salt to the saucepan and whisk to combine.  Place the pan over medium low heat.  Cook, stirring continuously with a heat proof spatula until the curd begins to thicken.  Take care to get into the corners of the pot with the spatula.  The curd is ready to ready to remove from the heat when it is thick and glossy and coats the spatula.  Remove from the heat and cool completely.  Refrigerate in a covered container until ready to use.

The curd will keep for a week in the refrigerator.


Monday, January 12, 2015

Crispy Chewy Almond Cookies {Amaretti}


It's early January, cold and gray here in Germany and the snow from two weeks ago that was so beautiful and dazzling white as it laid fresh on the ground now lingers in slushy little piles that are the saddest remnants of their former selves.

It's easy to be a little melancholy right now. The weather is less than inspirational for sure. And all of the festive excitement of the holidays is a memory. Germany really has a love affair with Christmas that lasts for a good 6 weeks and the withdrawl from the festivity is tough to take.  The Christmas markets are over.  The twinkly lights and ornaments have been packed away and (in our case) the tree has been drug down the street to the neighborhood collection spot in a parking lot. It really is a sad sight to see- all of those beautiful trees just tossed into a big pile next to a soccer stadium and bus stop.


I'm not the kind of girl who makes New Year's resolutions. Probably because I know I'd never stick to them. I always try to do a little better with my health, eat a little better, stay on top of housework more. You know, the standard stuff.  It's not really working out just yet, but I promise when the weather gets better and the baby goes back to her normal sleepy schedule...

I do have to admit that I'm a little excited about a new "Mom and baby" yoga class starting soon, truth be told.  I happen to really like my yoga instructor and I could certainly use the help.  After three c-sections my core is.......well......let's not even go there. 

So you're not going to get a ton of new year healthy recipes from me (not really sorry about that, sorry!).  In my opinion, healthy eating really only works if you allow yourself a little treat now and again.  So I'll handle the little treats for you if you can manage the healthy part on your own.  Deal?  Deal.


Crispy Chewy Almond Cookies {Amaretti}
Makes about 6 dozen cookies.
For the printable recipe, click here.

These cookies are delightfully good.  There is a perfect balance between the shatteringly crisp exterior and chewy center that cannot be beat.  They are based on one of my favorites, the Italian pignoli cookie, but it turns out that I didn't have pine nuts in my freezer so I quickly decided to use the sliced almonds that were there instead and was totally pleased with the results (even my kids ate them and they hate nuts!).  I also ended up making my own almond paste for this cookie, something I had never done before.  I guess Germans don't use it (but they seem to really love marzipan- odd) because it was nonexistent in the local stores.  I actually really loved my homemade almond paste much more than the store bought stuff and it was so easy I may never buy it again.  If you don't have already ground almonds available just whiz some whole or slivered almonds up in your food processor or blender so that you end up with 1 1/2 cups of the ground stuff. 

Almond Paste:

1 1/2 cups ground almonds (or almond flour)
1 1/2 cups pure cane sugar
1 tsp pure vanilla extract (or almond extract if you want it extra almond-y)
1 egg white

Place the ground almonds into a food processor and pulse until the almonds begin to form a paste.  Add the rest of the ingredients and blend until you have a thick paste.  The almond paste can be refrigerated at this point for up to three days.

Cookie dough:

2 egg whites
1 recipe almond paste
2 tbs honey
3 tbs all purpose flour

Preheat your oven to 350 degrees.  Line a baking tray with parchment paper or a silicone baking mat.

In a large bowl beat the egg whites until they begin to get frothy.  Using a hand mixer or stand mixer, blend the almond paste into the egg whites in small increments until just blended in.  Add the honey and flour and beat until fully combined.

Spoon quarter sized mounds of the cookie dough 2 inches apart from each other on the prepared baking sheet (you could also pipe the dough with a piping bag).  Bake for 7-9 minutes until the tops of the cookies turn golden, they have spread and the tops have crackled.  Let them cool completely on the parchment or baking mat before peeling off.  To speed things up you can slide the parchment with the cookies onto a wire rack and replace it with a clean parchment to bake a second batch while the first batch cools.  You can continue to swap out the two sheets of parchment until all the cookies are baked.

The cookies keep well in an airtight container for 3-5 days.


Sunday, December 21, 2014

Whole Wheat Cookie Butter Waffles and What I "Chairish"


We are a military family.  And that means a great many things.  There are the things you think of instantly like sacrifice, deployments, pride, love of country, transience.

Without question these things all apply to my family.  For sure we've had our share of trying times just like any other military family.  Both of our sons have spent a long periods of time without their dad at home.  That wasn't easy on the boys or their dad.  And in the meantime I had to be both mom and dad for them and hope that they weren't missing too much.  Nothing about that was simple or fun.  And just when I thought that things were going to be normal and whole when my Navy man got home from long deployments we found that there was confusion about how we all fit back together.  The boys didn't know their dad and he didn't know them.  And how did I fit in the picture now that I was needed less than I had been the days, weeks and months before?

But the thing about that struggle is that in the end, it's what makes our family as strong as it is.  It makes us appreciate each other and every day that we have together.  What a blessing that is.


One of the least appealing aspects of being a Navy spouse is all that moving around.  If I'm talking about the emotional side of things there is the loss of ever feeling rooted in a place; settled and home.  It's a game of "new and old".  My kids are the new ones in school, we have to make new friends, settle into a new house and neighborhood and start new jobs.  Then there's the old- we miss our old friends, liked the old house better or could find our way around in the old place so much better than the new one.  That's a lot to handle every few years.  There's quite a bit of wear and tear on the hearts of our military families.

But it's not just our hearts and minds that take a beating.  Our things go through just as much stress and strain with each move.  Imagine taking apart your cabinets, beds, tables and shelves every three years, packing them up and shipping them to a new home across the country.  Then there's the toys, clothes, pots and pans, TVs, books and dishware to wrap and pack into boxes.  It's a difficult life being our "stuff".  You know the saying "This is why we can't have nice things"?  Well, that's certainly true of my family and many like mine. 


When we moved to Germany last year a good deal of our most precious belongings were sent into long term storage.  I just couldn't bear the idea of my mother in law's Limoge china set being shipped on a boat and handled time and time again before it got to me a continent and ocean later.  Or my husband's beautiful wooden high chair from childhood being taken apart and the screws and bolts lost or legs broken.  In the end there were only a couple of precious family heirlooms that made the trip with us- things I just couldn't imagine not being in our home.

One of those things is the china set that was hand painted by my mother for my husband and me.  There are only a few pieces- a soup tureen and platter, maple syrup pitcher and powdered sugar shaker.  But they are one of the last pieces Mom painted after a long run of painting and selling china out of our home as a side business.  Not too many others in our family can say that they have a piece custom made just for them and I always look at them with pride and awe that they were made for us.  They are precious to me.  In fact I very rarely use them for fear of them breaking.  The soup tureen has never seen a drop of soup!


Not long ago I was approached by the lovely folks over at Chairish to write a post featuring a family heirloom that I "chairish" and how I showcase it in my home.  (Haven't heard of Chairish?  It's a modern day consignment shop where you can buy and sell vintage home decor, furniture and jewelry along with like-minded stylish folks all over the US)  I had to think about this one for a while not having too many of those precious items with me.  But when my eyes landed in my mother's china pieces I knew it was time to break them free from their years of sitting on a shelf in my china cabinet.

So here they are in all of their glory, serving up what will likely be Christmas breakfast for the people who I cherish most in the world- my family.  I can't think of a better reason to use the prettiest china in my cabinet.


Whole Wheat Cookie Butter Waffles
Serves 6 hungry folks or 8 regular ones.
For the printable recipe, click here.

My usual Christmas morning breakfast is gingerbread pancakes.  Having discovered the beauty that is speculoos cookie butter, I thought I'd switch it up a bit this year.  So these waffles were born.  I tried to balance the sweet cookie butter with a healthier flour, so these waffles are half whole wheat and half all purpose.  And to further bring out the buttery cookie-ness of the waffles I browned the butter that went into the batter.  Otherwise these are fairly straightforward and very easy waffles to make.  No yeast or whipping egg whites here, just mix, pour into the waffle maker and enjoy.  And if you really feel like these aren't fit for breakfast I can see absolutely no reason why you couldn't crisp up a couple of waffles and sandwich them around a scoop of ice cream.  What a treat!

5 tbs butter
1 cup whole wheat flour
1 1/4 cups all purpose flour
3/4 cup speculoos cookie butter
1 tbs brown sugar
2 eggs
2 1/4 cups milk
1/4 cup neutral flavored oil

Place the butter in a small saucepan over medium low heat.  Melt the butter and then continue cooking the butter until the  milk solids begin to turn a light golden brown (3-4 minutes longer).  Remove from heat and cool completely.

Heat your waffle maker according to manufacturer's directions.

In a large bowl stir together the cookie butter, brown sugar, eggs, milk and oil.  Add the whole wheat and all purpose flour and stir until just combined.  Stir in the cooled butter.

Spray your waffle maker with cooking spray or brush with butter.  Pour 1/4-1/3 cup of the batter into each section of the waffle maker (this will, of course, depend on your particular waffle maker and the size and shape of the waffles it makes so you may have to adjust that amount to fit your situation).  Cook according to manufacturer's instructions.  I typically find that when you no longer see stream rising from the closed waffle maker, the waffles are finished.  Keep the finished waffles on a warm platter.

Serve with warm maple syrup, butter and powdered sugar.

Leftover waffles can be wrapped in foil and placed in a zip top bag in the freezer.  They warm up nicely in a 350 degree oven or toaster and will keep for three months in the freezer.


** This post contains links to other websites, but I was in no way compensated for my efforts.  All opinions, photographs and recipes are my own.


Tuesday, December 9, 2014

German Gingerbread {Lebkuchen}


This past week my youngest son's school had a Christmas party.  Families were invited and we grilled bratwurst over fire pits in the school yard, had hot punch and shared Christmas sweets.  If this seems like an idyllic German setting, let me set the record straight.  It was dark at 4:00 pm, 37 degrees out and mistily foggy.  It was a GREAT idea and I was super excited for it, but the reality was not so wonderful.  Let's just say we only lasted as long as it took my oldest to grill his bratwurst (which took way longer than his patience held out, truly) and have a few cookies.


I brought cookies to the celebration (of course).  I was excited and just a bit nervous to bring these particular cookies.  We had spent the weekend before exploring the Christmas markets in Munich and Salzburg and I fell in love with the cookie booths in both the German and Austrian cities. It's THE cookie around these parts.  And everyone's mom or grandma has their own way of making lebkuchen that is the "best" or "only" way to do it.  I think I went to one booth at the market in Salzburg that had 10 different versions for sale.  Some were studded with candies fruit, some dressed up with a chocolate coat and more plain versions decorated with almonds.  After all the tastings (purely for scientific reasons, of course) my favorites were lightly sweet and mildly spicy with a simple glaze and chewy middle.

The big question was- would my American version of everyone's favorite go over with the teachers and family's at my son's school.  I breathed a huge sigh of relief when I popped in the morning after the big grill out and the teacher gave me a big thumbs up while snacking on the leftover cookies.  Phew!  I'm so glad because I just love this cookie and having others feel the same way just feels so good.


German Gingerbread {Lebkuchen}
Makes about 3 dozen 3 inch cookies.
For the printable recipe, click here.

This recipe is the result of quite a bit of research into traditional lebkuchen recipes.  There were so many ways I could have gone, but I think after much tinkering I came up with my ideal version.  A few notes.  First, many lebkuchen recipes require long resting times either before or after baking to produce a more mature flavor.  I suppose that would work, but I found that an overnight rest in the fridge before baking was just right for my tastebuds.  Feel free to let the dough rest up to three days if you fancy a stronger spiciness.  Second, though I loved the snowflake cookie cutter that I used when making the cookies for this photo, I probably wouldn't use it again.  The spiky parts of the cookie baked much more quickly than I would have liked and I missed the chewy center that is the hallmark of the lebkuchen.  I think the angel shape was perfect, but if you really want to go traditional most lebkuchen that I saw in the markets were round.  If you find the cookies drying out as you keep them on your counter, take a cue from the Germans and place a slice of apple in your cookie jar to keep your lebkuchen fresh.

1/2 cup honey
2/3 cup packed brown sugar
1 large egg
2 1/2 cups all purpose flour
1/2 cup almond flour

1 tbs cocoa powder
1/2 tsp baking soda
1 tsp cinnamon
1/2 tsp ground cloves
1/2 tsp ground ginger
1/4 tsp ground cardamom
1/2 tsp fresh lemon zest

1/2 cup sifted powdered sugar
2 tsp water

In a large bowl beat the honey, brown sugar and egg together.  Add the dry ingredients and carefully stir then into the wet ingredients until they are fully incorporated.  Cover the bowl and refrigerate the dough overnight and up to 3 days.

When ready to bake the cookies, preheat your oven to 350 degrees and line a cookie sheet with parchment.  Roll the dough out on a lightly floured surface (it can be a bit sticky) to 1/4 inch thick.  Cut shapes using a cookie cutter between 2 and 3 inches in diameter.  Place cookies on the prepared cookie sheet with a couple of inches between each cookie.  Bake one sheet at a time for 5-7 minutes.  You want the cookies to puff in the center and get just the lightest of golden on the edges but NOT browned.  If you let the cookies bake until browned they will be hard and lose their chewy middle.  Let the cookies cool for a couple of minutes to make them easier to handle before transferring them to a wire rack to cool completely.

Continue rolling and cutting cookies until you are out of dough (scraps can be rerolled a few times before it gets tough).

Meanwhile, mix together the powdered sugar and water to get a thin glaze.  When the cookies are completely cooled, brush them with the glaze.  Give the glaze a few minutes to set before serving.

Cookies will keep in an airtight container for 3 days on the counter.


Friday, August 15, 2014

Zwetschgenkuchen {German Plum Cake}


I'm ready.  Done.  That's all she wrote folks....

I have never been one of those women who gets all glowy in pregnancy.  I don't gush and squeal and get all excited about ultrasounds.  I'm much more matter of fact about things.  I get the medical, clinical side of things and that's what I'm comfortable with.  But you're not going to see me glowing in all of my impending mommy-ness.  That's just not me.  I'm not even really a baby person.  I don't think I've ever walked up to a stranger with a baby and gotten all gooey about the baby's cuteness.  Other people babies make me a bit uncomfortable.  I'll hold your baby if you ask, but I'm not going to be the first to volunteer.  Not even the second if I'm being really honest.


Don't get me wrong- I love my children more than I ever would have thought possible.  I loved them when they were babies and was so thrilled that each of those little people was mine.  I've just found myself more comfortable with them as they've grown older.  More at ease and like I fit in my role as a mom.  I think I hit my stride somewhere around the 2 year old mark with each of my boys.  I enjoy them and their unique personalities and I feel much more like I fit into this "Mom" skin of mine.  So I guess to me, it's no surprise that I'm sort of ready to get on with this show. And by that I mean baby #3.

It's taken me this long to get used to the idea that there will even be a baby #3.  That's funny, I know.  The reality seems to finally be hitting me and I've gone into a bit of a nesting mode.  Names are being debated.  My husband and I never seem to agree until the last second and to his credit (shhhh...don't tell him I said this....) he is the one who's come up with the winning name each time with the boys.  We've got a little over 3 weeks until baby sister comes along, we'll come up with something great.  I'm just ready...


Zwetschgenkuchen
Makes 8 muffin-sized cakes.
For the printable recipe, click here.

This is one of the first treats I had here in Germany.  It's everywhere this time of year.  We're in the heart of plum season and this plum is one of two (the other being the Mirabelle) that you would typically find in the markets.  The plum to use here is called, in German, a Zwetschgen.  You might find it in the U.S. labeled as an Italian prune plum.  Damson plums would also be great in this recipe.  Of course, any plum you use will taste great so don't hesitate to try it if you can't find the ones I've used.  I did a bit of a take on the traditional in a couple of ways.  Usually this is baked as one large tart-like cake (in some parts of Germany the base is even made with a yeast dough, but not here in the south).  I've done them as mini cakes which I find get eat more quickly around my house.  And in deference to my gestational diabetes I tried to back off on the sugar and white flour.  I subbed in some oat flour in place of plain flour and I think it's really deliciously nutty.  One last note- in the photos you'll see some plum slices poking out.  I wish there had been way more!  So I'm going to write the recipe with that in mind.  If you're going to make a plum cake, you really need to taste the plum!

For the cake base:
1/4 cup plus 2 tbs sugar
5 tbs butter, room temperature
1 tsp lemon zest
1 large egg
1/2 cup plus 2 tbs oat flour (if you can't find this in the store, you can grind whole rolled oats into a powder in a food processor)
1/2 cup unbleached all purpose flour
3/4 tsp baking powder
1 tbs milk

8 Italian prune plums or Damson plums (or 6 regular plums)

For the streusel:
3 tbs cold butter
1/4 cup sugar
2/3 cup unbleached all purpose flour
2 tbs rolled oats

You can make the cake base by hand, with a food processor or mixer.  I did it in my food processor, but the steps would remain the same.  Place the sugar, butter and lemon zest in the bowl of a food processor and blend until light and fluffy and the sugar has dissolved.  Add the egg and quickly incorporate until the mixture is smooth.  Mix in the flours and baking powder and then the milk.  You will have a smooth, soft dough not unlike a cookie dough.  Refrigerate for a half hour to set the dough slightly.

In the meantime, pit and slice the plums into 6 slices (for the prune plums or Damsons, at least 8 slices for a larger plum).  Make the streusel by stirring together the sugar, flour and oats.  Using your fingertips, blend the butter into the dry ingredients until the streusel holds together in clumps and the butter in in pieces about the size of peas.

Remove the cake base dough from the refrigerator and preheat your oven to 350 degrees.  Divide the dough into 8 balls and press each ball into the bottom of a regular sized muffin cup, pressing so that the dough is even and also spread slightly up the sides of the muffin cup.  Place as many plum slices as you can fit into the muffin cup.  Repeat this procedure for each of the 8 cakes.  Divide the streusel evenly over the plums in each cup.  Bake the cakes for about 20 minutes.  The tops will be firm to the touch and the streusel a light golden color.  Cool completely before serving.


Monday, June 2, 2014

Strawberry Apricot Breakfast Bars


When I started this blog 3 years ago, I was simply trying to document my family's favorite recipes and maybe have a place to point friends to when they asked for the recipes.  I hadn't counted on enjoying it as much as I do or falling in love with food photography (even though I'm clearly still not the world's best at it).  I somehow never dreamed that it would still be going all these many posts later.


I've been going though a bit of a funk lately.  I'm going to chalk it up to being 6 months pregnant and just exhausted, both mentally and physically.  I have these moments of energy and inspiration and can cook, bake and photograph up a storm.  But they run out quickly and I'm back to  feeling blah.  So I've actually got a ton of recipes hanging out in files all edited and ready to go, but I run out of motivation when it comes to getting them out to my (tiny but loyal) following.  This recipe is one of those that's been lingering for a while, but so worthy of sharing.

The inspiration for our favorite breakfast bars was a particularly good market day a few weeks back.  Both strawberries and apricots were beginning to make their way to the market and as they are among my little guy's favorites, I brought home a whole lot of both.  The apricots were, as early season fruit often are, a bit on the tart side. So instead of eating out of hand, I turned them into a quick jam.  Coupled with a recipe from the wonderful Pioneer Woman and the few remaining strawberries I whipped the bars up.  The rest is history, as they say, and I have made these bars at the request of my kids several times since.


Strawberry Apricot Breakfast Bars
Makes 12 bars.  Recipe adapted from Pioneer Woman.
For the printable recipe, click here.

I like to throw a bit of whole wheat flour into the mix with these bars.  Maybe it's only psychological, but I feel like I making them healthier by doing so.  I eat the bars for breakfast and it makes me feel better about it.  These are simple to whip up and can be made completely by hand or in the food processor.  Feel free to change up the fruit to suit your taste.  The bars would be equally delicious for dessert served with vanilla ice cream. 

1 1/2 cup all purpose flour
1/2 cup whole wheat flour
1 cup old fashioned oats (not quick cooking)
1 cup brown sugar
1 tsp baking powder
1 tsp grated nutmeg
14 tbs butter (2 sticks minus two tablespoons), cut into small pieces
about 1 cup apricot jam
handful of strawberries, washed, hulled and sliced

Preheat your oven to 350 degrees.  Butter a 9 x 13 inch pan and set aside.

In a large bowl, whisk together all of the dry ingredients (all purpose flour through nutmeg).  Blend the butter into the flour mixture with your fingertips or a pastry blender.  You want the butter to be well blended with the largest of any remaining pieces being no bigger than a pea.  The mixture should hold together when pressed between your fingers.

Press half of the crust mixture into the prepared pan.  Spread the jam over the bottom crust, being careful not to disturb the crust below too much.  Place the strawberry slices in one even layer over the jam.  Pour the rest of the crust over the top, spread evenly and press gently into place.

Bake the bars for 35-40 minutes until the top is just lightly golden and set.  Cool completely before cutting and serving.  The bars will keep on the counter, well wrapped, for 2-3 days.