Showing posts with label Tuesdays with Dorie. Show all posts
Tuesday, March 4, 2014
Buttermilk Scones {A Tuesdays with Dorie Post}
I have a serious obsession with, no, addiction to scones. They are ones of my all time favorite breakfast foods. And that's saying something because I absolutely love breakfast. Especially when I get to linger over a great spread with friends or (on really special days) the quiet of my child-free home after dropping my kids off at school. There's just something about the light of the morning, a good book, a cup of steaming tea and warm, flaky scones that makes my day start in just the perfect way.
My favorite scones have always been ones made with a copious amount of butter and cream. I've made versions with Meyer lemon, chocolate chunks, and even pumpkin. They always turn out just the way I like them- light and fluffy with plenty of rich flavor. So when these scones turned up in the Tuesdays with Dorie schedule I was a bit skeptical. How well would buttermilk do the job of replacing cream? Would the scones be too much like biscuits and not enough like the scones that I love?
I am now officially a convert.
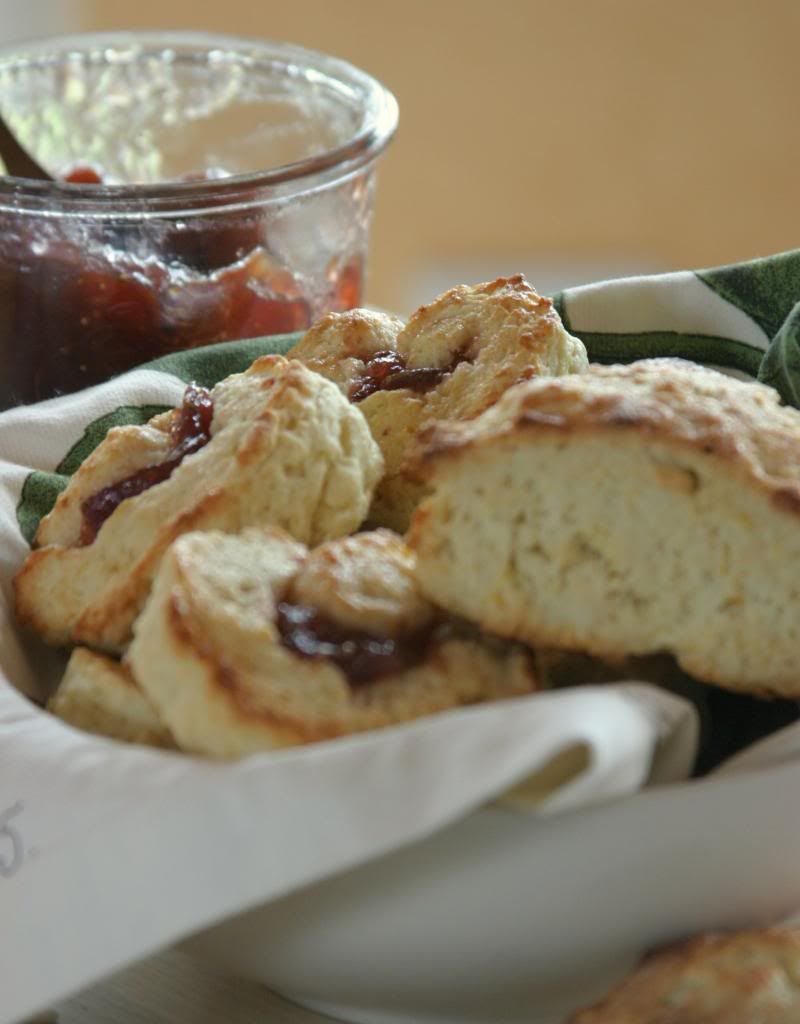
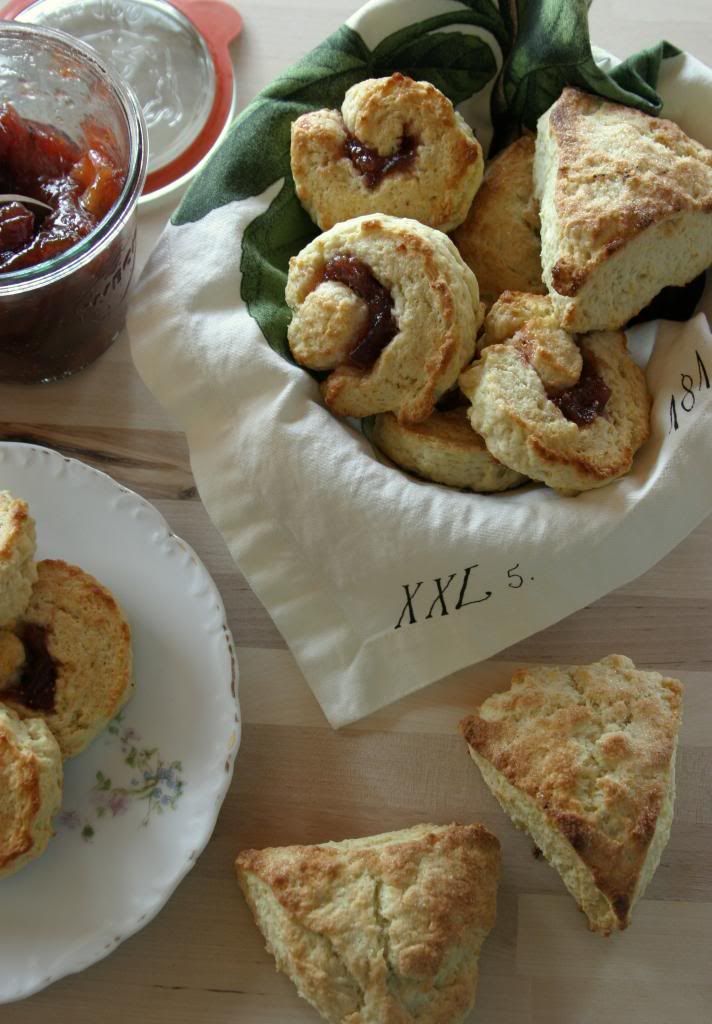
These buttermilk scones were every bit as good as the cream based scones that I usually make. And I just loved the idea of creating the jam-filled pinwheel shaped scones. They were absolutely delicious, if a bit messy to fill and cut. I filled mine with home made fig jam, but I'm positive the scones would be just as wonderful with any berry flavored jam or even lemon curd (Oh! Now there's a great idea I just came up with.).
Can't wait to see what other wonderful variations my fellow bloggers came up with? Check them all out on the Tuesdays with Dorie page!
Buttermilk Scones
Makes 1 dozen triangle shaped scones or 24 spiral ones. Recipe from Baking with Julia, edited by Dorie Greenspan.
For the printable recipe, click here.
I rarely ever follow a recipe exactly, but found little need to make any changes with this one. I did cut back on the butter needed to brush the tops (I only used about half of what the original called for). This recipe makes quite a few scones- directions for freezing uneaten scones are at the end. If I were to make these again, and I'm sure I will, I would probably halve to recipe.
3 cups all-purpose flour
1/3 cup sugar
2 1/2 tsp baking powder
1/2 tsp baking soda
3/4 tsp salt
1 1/2 sticks unsalted cold butter (6 ounces), cut into small pieces
1 cup buttermilk
1 tbs grated orange zest or lemon zest
2 tbs. unsalted butter, melted, for brushing
1/4 cup sugar, for dusting the tops
(If making the spiral scones)
4 tablespoons jam or jelly, and/or 4 tablespoons diced or small dried fruit, such as currants, raisins, apricots, or figs
Position the oven racks to divide the oven into thirds and preheat the oven to 425°F.
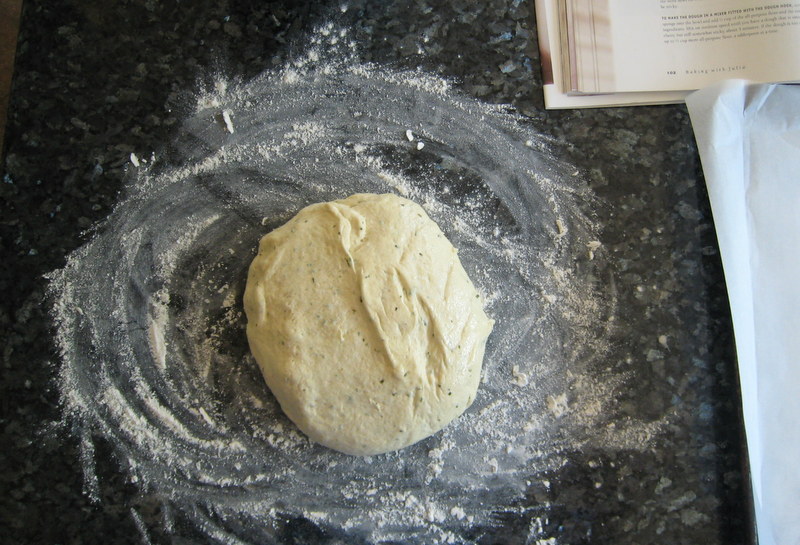
In a medium bowl, stir the flour, sugar, baking powder, baking soda, and salt together with a fork. Add the cold butter pieces and, using your fingertips (the first choice), a pastry blender, or two knives, work the butter into the dry ingredients until the mixture resembles coarse cornmeal. It's OK if some largish pieces of butter remain-they'll add to the scones' flakiness.
Pour in 1 cup buttermilk, toss in the zest, and mix with the fork only until the ingredients are just moistened--you'll have a soft dough with a rough look. (If the dough looks dry, add another tablespoon of buttermilk.) Gather the dough into a ball, pressing it gently so that it holds together, turn it out onto a lightly floured work surface, and knead it very briefly--a dozen turns should do it. Cut the dough in half.
TO MAKE TRIANGULAR-SHAPED SCONES, roll one piece of dough into a 1/2-inch-thick circle that is about 7 inches across. Brush the dough with half of the melted butter, sprinkle with 2 tablespoons of the sugar, and cut the circle into 6 triangles. Place the scones on a parchment lined baking sheet and set aside while you roll out the rest of the dough.
TO MAKE ROLLED SCONES, roll one piece of dough into a strip that is 12 inches long and 1/2 inch thick (the piece will not be very wide). Spread the strip with half of the melted butter and dust with half of the sugar. If you want to spread the roll with jam and/or sprinkle it with dried fruits, now's the time to do so; leave a narrow border on a long edge bare. Roll the strip up from a long side like a jelly roll; pinch the seam closed and turn the roll seam side down. Cut the roll in half and cut each piece into six 1-inch-wide roll-ups. Place the rolled scones cut side down on a parchment lined baking sheet, leaving a little space between each one. Repeat with the remaining dough.
Bake the scones for 10 to 12 minutes, until both the tops and bottoms are golden. Transfer the scones to a rack to cool slightly. These are best served warm but are just fine at room temperature.
If you're not going to eat the scones the day they are made, wrap them airtight and freeze; they'll stay fresh for a month. To serve, defrost the scones at room temperature in their wrappers, then unwrap and reheat on a baking sheet for 5 minutes in a 350°F oven.
Tuesday, December 17, 2013
Spelt (or Whole Wheat) Gingersnap Cookies {Tuesdays with Dorie}
This morning as I was dropping off my little one at school I caught a glimpse of another Mom who must be much more on top of things than I am. She was carry a little bundle of cookies all bagged up and be-ribboned to give to teachers as gifts. And it dawned on me- Christmas is in just one week. I've only got three more days to pull together something tasty and sweet for my boys' teachers.
How did that happen? Didn't I just implore good old St. Nick to gift me with a bit more time?
My plan was to bake up a few batches of tried and true cookies- including my favorite chai spiced chocolate crinkle cookies and maybe some pizzelles- to gift to teachers and neighbors. We've got a cookie swap coming up in a few days as well and the there's Operation Cookie Drop, which the USO organizes to drop off cookies to soldiers, sailors and airmen who are stuck standing watch on Christmas Eve and Christmas day. In other words, I think I'll be up to my eyeballs in cookies for the next few days. Thanks to my hubby, who gave me my Christmas present (a new Kitchen Aid mixer!) early, I think I'm up to the task. The only question is which other cookies I want to include in my treat bags?
I think these little cookies may just make the cut. I already have a favorite molasses cookie- from Cooks Illustrated- so I wasn't too sure about these, but I gave them a shot anyway. Unlike most other cookie recipes, this one only makes about a dozen cookies. I kind of like that. There are just enough cookies to satisfy without making so many that you can't stand them anymore by the time you finish them off. They're chewy, warmly spiced and couldn't be any more Christmas-y if they tried.
It's been forever since I posted a Tuesdays with Dorie recipe and I missed the fun group of bloggers that I get to bake along with. That international move just completely got in the way. And then, of course, I had to figure out how to get by in this tiny kitchen of mine and how to find what I need in the German grocery stores. Just like everything else lately, I'm a bit behind and still trying to play catch up. But I'm slowly getting there and this is the first step in getting back to normal (or at least my new normal). I'm going to include the recipe because I made a few changes. And here's the link to find everyone else's version of these tasty little cookies.
Spelt (or Whole Wheat) Gingersnap Cookies
Makes about 1 dozen cookies. Adapted from Baking with Julia, edited by Dorie Greenspan. Recipe by David Blom.
Click here for the printable.
I love that the ingredients list for these cookies is relatively short and the process is fairly simple and straightforward. I did feel the need to tweak it just a bit though. The first batch I made was strictly by the books. I found that for being called a gingersnap, the original didn't seem to have a whole lot of ginger or snap to it. So I upped the amount of spice a bit and added cloves. I liked the first batch, but felt my second lived up to its name more fully. I also swapped out the all purpose flour for spelt flour. Mostly because it was at the front of my cabinet, but also because I knew I could hide it easily from my family in an already deeply colored dough. I quite enjoyed the depth that it cave the cookie. If you can't find spelt, you can certainly use whole wheat or all purpose flour.
1/4 cup sugar
3 tbs unsulfured molasses
2 tbs butter at room temperature
1/2 tsp ground ginger
1/4 tsp cinnamon
1/8 tsp ground cloves
1/8 tsp baking soda
1 1/2 tbs water
3/4 cup spelt (or whole wheat) flour
To glaze the cookies, you'll need 1 tbs molasses and 1 tbs water.
In the bowl of a mixer fitted with the paddle attachment (or a bowl suitable for use with a hand mixer) place the sugar, molasses, butter spices and baking soda. Mix on medium speed until the butter is whipped and creamy and all of the ingredients fully incorporated. This should take about 2 minutes. Slowly mix in the baking soda and flour until you have a soft dough, about 1 minute more.
Wrap the dough in plastic wrap, shaping it into a rough square or rectangle. Place the dough into the refrigerator until it firms up, 2 to 3 hours (or freeze for 45 minutes).
When ready to bake the cookies, remove the dough from the refrigerator and preheat your oven to 325 degrees. Line 2 baking sheets with parchment paper or a nonstick silicone liner.
Generously flour your work surface and rolling pin as the dough is quite sticky. Roll the dough out into a rectangle between 1/8 and 1/4 inch thick. Using a 2 inch cookie cutter dipped in flour, cut out cookies from the dough. Place them on the baking sheets with just a bit of room between them- they spread very little if at all. You can re-roll the scraps and cut out more cookies. If the dough is too soft, place it back into the refrigerator or freezer until it firms up a bit.
Mix the glaze and brush it on the unbaked cookies. Don't be too generous with the glaze, it can make the cookies a bit soggy. Bake the cookies for about 6 minutes. They will puff up and become just a bit firm (they will fall back down when cooling). Cool the cookies on the baking sheet for about a minute before removing them to finish cooling on a wire rack. The cookies will keep for up to 4 days in a well sealed container.
Monday, June 17, 2013
Tomato and Cheese Galette {A Tuesdays with Dorie Post}
As I sit here trying to organize my thoughts this evening, I am eating a bowl of my Mom's homemade chicken and orzo soup still buzzing with excitement from a fun night out. I was invited to the Friends and Family preview evening for the newest Whole Foods to open up in the area. That's a post for a different time, but let's just say that I found myself giddy to be standing in a grocery store being poured a local pinot noir at a bar built into an Airstream. It was really fun (and the pinot was excellent!).
The sight of all of the signs pointing out the locally produced (and hyper locally as well- that means within a 5 mile radius of the store) fruits and veggies, wine, cheese, granola and other spectacular looking foods was wonderful to see, but it did make me a bit sad. Sad that in just a few short weeks, I'll be leaving it all behind. That's not to say that I am not in anyway looking forward to the adventures in my near future. I fancy myself riding my bike to the local butcher, dairy farmer and Saturday market and filling up my wicker basket with all I need for the week's meals. But I will definitely be missing my garden and the fabulous produce that we have such easy access to here in Southern California.
Most of all, I will miss the tomatoes. I planted a full garden's worth earlier in the spring knowing that I wouldn't likely be around to enjoy the fruits of my labor. But I couldn't bear to see the garden's brown earth remain barren where in the summers past they had been covered in cucumber vines, herbs and stakes tied with branches holding up the most beautiful of tomatoes. The first of this years crop are just beginning to find their way into the light. The cherry tomatoes are hanging on the vines, small and still green, but with the promise of something much more. I was hoping to have a tomato ready to eat before I moved, but I guess that's just not in the cards.
I can imagine the dark red heirloom Riesentraube tomatoes- growing right next to a patch of basil- would have been just perfect in this sweet little tart. It's a savory tart, almost like a fancy pizza, with a crisp and flaky crust. I'm so glad I found it. Perhaps one day soon, in the warmth of a late European summer afternoon I might pull another out of my new (and tiny) German oven. For now, I'll have to be happy with making the best of the few early tomatoes I can find in my own SoCal Saturday market instead. Sad to be leaving but happy to have been here to experience it in the meantime.
Tomato and Cheese Galette
Makes 1 8-inch galette. Adapted, only slightly, from Baking with Julia by Dorie Greenspan.
For the printable recipe, click here.
This is a Tuesdays with Dorie post, so there are plenty of other pretty pies to check out on the official page. I decided to vary the cheese selection a bit, thinking that fontina would make a better partner for the mozzarella that the monterrey jack that was called for in the original. I was pleased with the result and my boys enjoyed nibbling on the extra pieces of fontina as the galette baked. That's a win-win in my book. Oh, and the crust is to die for. Just saying.
1 recipe of galette dough (recipe follows)
1/2 cup shredded mozzarella cheese
1/2 cup shredded fontina cheese
1/4 cup fresh basil leaves, cut into chiffonade (finely shredded) or torn
2 to 3 ripe plum tomatoes or 1 1/2 cups grape or cherry tomatoes, cut into 1/4-inch-thick slices
3 tbs grated parmesean cheese
Preheat the oven to 400° and position a rack in the lower third of the oven. Prepare a baking sheet by lining it with parchment paper.
On a lightly floured work surface, roll out the dough into an 11-inch circle that’s about 1/8 inch thick. The dough is quite soft so make sure to lift it now and then and toss some flour under it and on the top to prevent it from sticking everywhere. When you’ve accomplished the above dimensions, move it to your prepared pan. The best and easiest way to move this dough is to roll it up around your rolling pin and then unroll it onto the prepared baking sheet.
In a bowl, toss the mozzarella and fontina cheeses and basil together and then sprinkle it over the rolled out dough, leaving a 2-3 inch border. On top of the cheese, place the tomatoes in concentric circles, again leaving the couple inch border. Fold the uncovered border dough up over the filling, allowing the dough to naturally pleat as you work your way around the galette. Sprinkle the parmesean cheese around the fluted edges of the crust.
Bake the galette for 35-40 minutes, or until the pastry is golden and crisp and the cheese is bubbly. When it’s done, allow the galette rest on the sheet for 10 minutes. Cut apart with a knife or pizza wheel and serve.
Galette Dough:
1 1/2 tbs buttermilk
2 1/2 tbs (approx.) ice water
1/2 cup all-purpose flour
2 tbs cup yellow cornmeal
1/2 tsp sugar
1/4 tsp salt
3 1/2 tbsp cold unsalted butter, cut into 4-5 pieces
By Hand:
Stir the buttermilk and ice water together in a small bowl and set aside. Then, in a large bowl, combine the flour, cornmeal, sugar and salt and stir with a fork to mix. Drop in the butter chunks and toss them a round a bit to coat them with the flour mixture. Using a pastry blender, work the butter into the flour, working for butter pieces that range in size from bread crumbs to small peas.
Add the cold water/sour cream mixture into the dough 1 tablespoon at a time, stirring with a fork after each addition to evenly distribute the liquid. When all the mixture has been added, the dough should be moist enough to stick together when it’s pressed; if it’s not, add in more cold water, 1 teaspoon at a time. Use your hands to gather the dough together.
When you’ve gathered it together into a cohesive ball, press the dough into a disk shape, wrap in plastic and chill for at least 2 hours.
In a Food Processor:
Stir the buttermilk and ice water together in a small bowl; set aside. Put the flour, cornmeal, sugar, and salt in the work of a processor fitted with the metal blade; pulse to combine. Drop the butter pieces into the bowl and pulse 8 to 10 times or until the mixture is speckled with pieces of butter that vary in size from bread crumbs to peas. With the machine running, add the buttermilk mixture and process just until the dough forms soft, moist curds.
Remove the dough from the processor and press it into a disk. Wrap in plastic and chill for at least 2 hours.
The sight of all of the signs pointing out the locally produced (and hyper locally as well- that means within a 5 mile radius of the store) fruits and veggies, wine, cheese, granola and other spectacular looking foods was wonderful to see, but it did make me a bit sad. Sad that in just a few short weeks, I'll be leaving it all behind. That's not to say that I am not in anyway looking forward to the adventures in my near future. I fancy myself riding my bike to the local butcher, dairy farmer and Saturday market and filling up my wicker basket with all I need for the week's meals. But I will definitely be missing my garden and the fabulous produce that we have such easy access to here in Southern California.
I can imagine the dark red heirloom Riesentraube tomatoes- growing right next to a patch of basil- would have been just perfect in this sweet little tart. It's a savory tart, almost like a fancy pizza, with a crisp and flaky crust. I'm so glad I found it. Perhaps one day soon, in the warmth of a late European summer afternoon I might pull another out of my new (and tiny) German oven. For now, I'll have to be happy with making the best of the few early tomatoes I can find in my own SoCal Saturday market instead. Sad to be leaving but happy to have been here to experience it in the meantime.
Tomato and Cheese Galette
Makes 1 8-inch galette. Adapted, only slightly, from Baking with Julia by Dorie Greenspan.
For the printable recipe, click here.
This is a Tuesdays with Dorie post, so there are plenty of other pretty pies to check out on the official page. I decided to vary the cheese selection a bit, thinking that fontina would make a better partner for the mozzarella that the monterrey jack that was called for in the original. I was pleased with the result and my boys enjoyed nibbling on the extra pieces of fontina as the galette baked. That's a win-win in my book. Oh, and the crust is to die for. Just saying.
1 recipe of galette dough (recipe follows)
1/2 cup shredded mozzarella cheese
1/2 cup shredded fontina cheese
1/4 cup fresh basil leaves, cut into chiffonade (finely shredded) or torn
2 to 3 ripe plum tomatoes or 1 1/2 cups grape or cherry tomatoes, cut into 1/4-inch-thick slices
3 tbs grated parmesean cheese
Preheat the oven to 400° and position a rack in the lower third of the oven. Prepare a baking sheet by lining it with parchment paper.
On a lightly floured work surface, roll out the dough into an 11-inch circle that’s about 1/8 inch thick. The dough is quite soft so make sure to lift it now and then and toss some flour under it and on the top to prevent it from sticking everywhere. When you’ve accomplished the above dimensions, move it to your prepared pan. The best and easiest way to move this dough is to roll it up around your rolling pin and then unroll it onto the prepared baking sheet.
In a bowl, toss the mozzarella and fontina cheeses and basil together and then sprinkle it over the rolled out dough, leaving a 2-3 inch border. On top of the cheese, place the tomatoes in concentric circles, again leaving the couple inch border. Fold the uncovered border dough up over the filling, allowing the dough to naturally pleat as you work your way around the galette. Sprinkle the parmesean cheese around the fluted edges of the crust.
Bake the galette for 35-40 minutes, or until the pastry is golden and crisp and the cheese is bubbly. When it’s done, allow the galette rest on the sheet for 10 minutes. Cut apart with a knife or pizza wheel and serve.
Galette Dough:
1 1/2 tbs buttermilk
2 1/2 tbs (approx.) ice water
1/2 cup all-purpose flour
2 tbs cup yellow cornmeal
1/2 tsp sugar
1/4 tsp salt
3 1/2 tbsp cold unsalted butter, cut into 4-5 pieces
By Hand:
Stir the buttermilk and ice water together in a small bowl and set aside. Then, in a large bowl, combine the flour, cornmeal, sugar and salt and stir with a fork to mix. Drop in the butter chunks and toss them a round a bit to coat them with the flour mixture. Using a pastry blender, work the butter into the flour, working for butter pieces that range in size from bread crumbs to small peas.
Add the cold water/sour cream mixture into the dough 1 tablespoon at a time, stirring with a fork after each addition to evenly distribute the liquid. When all the mixture has been added, the dough should be moist enough to stick together when it’s pressed; if it’s not, add in more cold water, 1 teaspoon at a time. Use your hands to gather the dough together.
When you’ve gathered it together into a cohesive ball, press the dough into a disk shape, wrap in plastic and chill for at least 2 hours.
In a Food Processor:
Stir the buttermilk and ice water together in a small bowl; set aside. Put the flour, cornmeal, sugar, and salt in the work of a processor fitted with the metal blade; pulse to combine. Drop the butter pieces into the bowl and pulse 8 to 10 times or until the mixture is speckled with pieces of butter that vary in size from bread crumbs to peas. With the machine running, add the buttermilk mixture and process just until the dough forms soft, moist curds.
Remove the dough from the processor and press it into a disk. Wrap in plastic and chill for at least 2 hours.
Labels:
Appetizers,
Breads,
CSA,
Main dish,
Pizza,
Summer,
Tomatoes,
Tuesdays with Dorie,
Vegetables,
Vegetarian
Monday, May 6, 2013
Upside Down Almond Apricot Skillet Cake {A Tuesdays with Dorie Post}
Sometimes there is just no story to go with a recipe. I don't always have a soulful narrative to go with the recipe for each and every cake I post. There are times when a cake is just a cake and the only reason I made it was because it sounded good at the time. And because I got so excited about the apricots I found at the market that I couldn't help but buy three pounds of them as if I would never see them again. And that really is the only story here.
So here is a cake that is just a cake. Made with a few from the many pounds of apricots I felt I could sacrifice before turning the rest into jam. But really, could I give you a cake that was ONLY a cake? It's a Tuesdays with Dorie cake, which means that it comes from a book curated by Dorie Greenspan and Julia Child. Meaning that it can't be just any ordinary cake. This one is a lovely upside down cake with a tender crumb and lightly caramelized fruit and nut topping.
It's a cake that will make you smile. A cake that you can serve with tea to a group of your favorite people. It's a cake that makes a great after school snack with a big cup of milk. It's one of those cakes that will become a go-to. It is anything but ordinary. It's extraordinariness comes from its simplicity and versatility and also from its ability to bring you comfort on a rainy spring afternoon. I think that takes this cake far beyond the ordinary.
Because I can't leave well enough alone, I couldn't hep but fiddle with the original recipe. You can find the recipe as written in Baking with Julia on the blog of our host this week, Erin (When in Doubt...Leave it at 350). And here's a list of the changes that I made:
::I swapped out the rhubarb for apricots (3 apricots, halved and each half sliced into fifths)
::I used sliced almonds instead of the pecans and amaretto in place of the bourbon in the topping
::I didn't have creme fraiche, so greek yogurt took its place
::To up the almond factor, I replaced 2/3 cup of the all purpose flour with almond flour
::Oh, and I turned the cakes from several small cakes into one large one baked in a cast iron skillet
Check out how the other bakers fared with their ability to follow a recipe over at the Tuesdays with Dorie site. I really enjoyed this recipe and think you, my friends, will too if you give it a try.
Tuesday, April 2, 2013
Rustic Potato Loaves {A Tuesdays with Dorie Post}
There are times when words just don't do justice. This is one of those times. The aroma of fresh baking bread, the crack of the crust as you break through it, the taste of melting butter on the warm, soft interior. I can't come close to describing with words what my senses took in as I baked and ate these wonderful (and surprisingly simple) loaves. I think I may have to add this bread to my list of favorites...No I'm sure of it.
I loved this recipe, even the way it was written. Any recipe that needs to tell you to "have faith" is not written for those who come to it with any fear. So have no fear, it will work, I promise. It was an interesting method, different from any bread I've made before, but it turned out beautifully. Not able to leave any recipe as is, I decided to add chopped rosemary to half the dough and chopped chives and cheddar cheese to the other half. I enjoyed each just as much as the other.
It's an easy bread to make, if you just have a little faith that the odd method will work. For the full recipe, click on over to our host for this week, Dawn of Simply Sweet. And check out the loaves of the other bakers over at the Tuesdays with Dorie page.
Tuesday, February 5, 2013
Meyer Lemon Focaccia {A Tuesdays with Dorie Post}
I would like to believe that I have many positive virtues. I am kind, a good listener, and a loyal friend. However I also know that there are several virtues that I would love to have that my character simply lacks. At the top of that list is patience. I try my hardest to be a patient mother, wife and friend. For me it is hard work and something I have to be very conscious of, because it just doesn't come naturally. I've been reading a series of books with my oldest in which the main characters are Greek demigods and each has a fatal flaw that gets him or her into trouble- ego, blind loyalty, short sightedness, that sort of thing. And I've often thought to myself while reading the stories that I would probably have more than one fatal flaw and one of them would most definitely be impatience. I don't think I would make a very good demigod.
In this case, my lack of patience meant that a lot of precious ingredients and my time all went to waste because I just couldn't wait a full day (or even 6 hours for that matter) for this lovely focaccia dough to rise properly. I had such high hopes of a tender and airy bread with a lightly crispy exterior and a salty sweet topping. Unfortunately, I was extremely disappointed. The thing is, I'm not a stranger to focaccia. I've made several of them that have graced this blog before. My favorite of them is a roasted grape focaccia that I made on a fall morning a couple of years ago. Of course, even in that post I mentioned that the dough would greatly benefit from an overnight rest in the fridge. So I ought to know better. I ought to follow my baking instincts instead of letting my impatience get the better of me. But my fatal flaw struck again.
I didn't let my dough rise nearly enough. A couple of hours on my counter and a couple more in the fridge just weren't enough to allow the yeast to do its thing and create the big air bubbles that are characteristic if a good focaccia. Instead I had a tough, almost cracker-like bread with a dull flavor. Though my topping was spot on- thinly sliced meyer lemons sprinkled with rosemary and a mix of coarse sugar and sea salt- it couldn't make up for the flaws in the bread. It would have been the perfect accompaniment to the roasted chicken I had planned for it to go along side. Sigh.
But I am determined to learn from my mistakes. I still have a ball of dough waiting for me in the refrigerator. I will try again and hopefully overcome my fatal flaw. The next focaccia will be exactly how it was meant to be, I just know it.
Perhaps my fellow bakers fared better in their attempts to be patient than I did. To find out, simply head on over to the Tuesdays with Dorie webpage and check out everyone else's breads. You can find the recipe for the focaccia on our host's site, Wandering Through. Just judging by Sharmini's cover photo, her focaccia rose perfectly. Maybe I'll read her post to see how she accomplished it while I wait (impatiently, of course) for my dough to rise.
Tuesday, December 4, 2012
Gingerbread Baby Cakes {A Tuesdays with Dorie Post}
It's beginning to look a lot like Christmas...
I've received my first Christmas cards and attended the first party of the season already. The neighborhood is beginning to resemble a good Griswold Christmas lighting scheme. It's truly my favorite time of the year and I make no apologies for it. Case in point- my husband told me that he was "assaulted" by the music from the Christmas station I had programmed on my car radio last weekend. Assaulted? Hardly. He should have just appreciated the music stylings of Bing Crosby, Nat King Cole and perhaps the Grinch thrown in for good measure. I certainly do as it's the background soundtrack to everything I do these days.
And these little cakes fit into the mood of the season perfectly. I'm so happy that my fellow Tuesdays with Dorie bakers decided to go with this recipe to start off December. Warm spices, molasses and a hint of the unexpected black pepper are just the sort of thing I am craving. One bite in and my hubby exclaimed that this is like his favorite molasses crinkle cookie in cake form- just what I was going for! Perfect!
I tested out one little cake with some lightly sweetened mascarpone and slices of Asian pear that had been poached in a chai-spiked syrup. It was simple perfection. But I had my eye on the rest of the cakes for something a bit more indulgent. Let's just say it involved caramel and whipped cream. But you'll have to check back later in the week for that recipe. I know, I'm such a tease...
As always check out how my fellow bakers fared with this lovely cake and come on back for part two on Thursday!
Tuesday, November 6, 2012
Buttermilk Crumb Muffins {Tuesdays with Dorie}
Muffins and I have a long, happy history together. They have long been my go-to breakfast. Especially my Mom's favorite recipe. Seriously good stuff. And easy- in about a half hour you can mix, bake and have on the table a batch of beautiful and delicious muffins. But recently, I have to confess, I've been cheating a bit on my beloved little quick bread.
It all started innocently enough with a simple scone recipe. But one bite of that gorgeous scone and I knew muffins would never quite hold the same place in my heart. Batch after batch rolled out of my oven to the delights of my two scone loving kiddos. It's a good thing meyer lemons and cranberries have a short season or I'd be having those scones every day!
So I hope you'll pardon my skepticism when I saw that these simple buttermilk muffins had been the first choice for November's Tuesdays with Dorie. I was hoping for a great pie, sort of a pre-Thanksgiving warm up. I know that's what I'm searching for when I hit the blogs and Pinterest these days. (Just so you know, I made one of those pies anyway, which you'll be seeing here next week!) But, ever the optimist, I decided to give the muffins a chance for no other reason than my three year old loves to help mix whatever I'm baking and this recipe was simple enough for him to mix with ease.
My skepticism was thrown out the window with the first taste. Tender, light, sweet and crumbly. Muffin heaven. Once again, I was won over by a Dorie/Julia recipe that I was prepared to determine was just okay. And maybe muffins might make their way back into my heart again. Or maybe not, after all cranberries are in season again...
Check out the other fab Tuesdays with Dorie bakers, especially Alisa at Easier than Pie who is our host this go round and has the recipe for you. Though I have a couple of recipe notes of my own. The original recipe calls for shortening and I just couldn't make myself use it. So I subbed an equal amount of butter with absolutely no problem. As I was chowing down on these beauties, I found them calling out for chocolate chips. Don't ask me why, they just did. So next time I may sprinkle a few dark chocolate chips in the batter. I know it will make the muffins sing.
Tuesday, October 2, 2012
Pumpkin Cranberrry Bread {A Tuesdays with Dorie Post}
Initially I was skeptical about this first choice for October's Tuesdays with Dorie recipies. So much so, in fact, that I almost didn't even bother trying it. I mean, really, how many pumpkin bread recipes do we need? The blogosphere is chock full of them and if you took a quick look at Pinterest, you'd find pumpkin bread all over the place. Admittedly, I hadn't actually looked at the recipe yet. But boy am I glad I did, because if I hadn't, I would have missed out on one beauty of a bread. A yeast bread, not a quick bread as I had assumed. As an added bonus, it's colorful and jam-packed with fall spices and little nuggets of bright flavors. Now that I can get excited about.
The only problem that I had with this tasty little bread was the waiting time. I just don't have the patience to wait for an overnight rise when I am as excited as I was to try this bread out. I don't mind one, even two, rising times, but an overnight wait? Well, I just couldn't do it. The bread would just have to settle for a couple hours in the fridge while I picked the kids up from school and ran a few errands, but that was all it was going to get. Thankfully, I think neither the flavor nor texture of the bread suffered. One bite into the soft warm bread slathered with butter and I knew I hadn't sacrificed anything in the name of my impatience. Pure heaven.
The best part- see those bright red gobs of goodness? Those are fresh cranberries (well, actually frozen ones left over from last winter's scone making), not dried. Without them, this bread would be nice, but nothing special. It's the unexpected tartness contasting with the sweet pumpkin and warm spices that take the bread from the realm of the ordinary, to the extraordinary. So as soon as those bags of cranberries start showing up in your market, scoop up several. You'll want to have extra on hand to make this bread over and over through the fall and winter. I promise, it's that good.
Oh, and just to be on the side of full disclosure, I didn't actually use pumpkin, but butternut squash leftover from a pound cake experiment. Made no difference whatsoever, in my opinion. And in place of the walnuts, I added toasted pumpkin seeds. It just seemed appropriate. I think you'd agree.
As usual, I implore you to go find the full recipe over at our hostesses' blog, This Bountiful Backyard. Rebecca didn't seem to enjoy the fresh cranberries as much as I did, but I won't hold that against her and neither should you. She did a beautiful job hosting and taking care of the fantastic recipe. Maybe some of the other Tuesdays with Dorie bakers agreed with me. I'm about to go find out!
Labels:
Breads,
Breakfast,
Christmas,
Fall,
Snacks,
Thanksgiving,
Tuesdays with Dorie,
Winter
Tuesday, September 4, 2012
Upside Down Plum Chiffon Cake {A Tuesdays with Dorie Post}
I've talked before about my extended Navy family (such as on this occasion or that one). They truly are a very special bunch of people and I feel blessed to have them in my life. And just recently my house became just a bit more noisy and active as we welcomed some very special Navy friends into our fold for a few days. 5 boys under the age of 10 running around your house can make for an intensely loud, but very fun time!
Our friends had just dropped off Dad for an 8 month deployment and their visit to our house was just the distraction they needed to help forget the sadness for a few days. That's part of the beauty of the Navy, no matter where you are, there's always someone nearby that you know you can rely on for help. I didn't even have to think twice when my friend asked if her brood of boys could take refuge with us. In fact, I welcomed the visit- the chance to see my friend who lives a two day drive away and for our boys to reunite after two years apart. It was as if time never passed.
As we sat at the table after getting the boys to bed that first night, I offered my dear friend a slice of this cake and a cup of tea. We sat and talked about our lives, caught up on the time that had passed and marveled at how much older and grown up our boys had become. Just the two of us and a few bites of something sweet. It was like old times again.
The cake wasn't perfect- it definitely had its flaws. The center sank as it cooled and I had way more streusel for the filling than I wanted. But like that night at the table, it was comforting and sweet and homey. Just right for an evening of catching up with an old friend, or perhaps (as is often the case with our crazy Navy life) welcoming a new one into your life.
To find the recipe for this Upside Down Plum Chiffon Cake you can visit the beautiful hosts for this week's Tuesdays with Dorie post, Marlise and Susan. Or you could pick up the book Baking with Julia (which I highly encourage). And as always, you really need to visit the blogs of the other Tuesdays with Dorie bakers to see what they baked up and if, like me, they just couldn't help but tweak the recipe to reflect their own personalities.
Tuesday, August 21, 2012
Popovers {A Tuesdays with Dorie Post}
My mom made popovers for us occasionally. Usually for dinner, alongside a stew, and drizzled with honey. In fact that's the best part of a popover. Drizzling your favorite topping down over the top and watching it disappear into the center knowing that a sweet surprise awaits you with every bite.
I wasn't sure I was going to make these popovers. After all, I had just put my stamp on mini Dutch Baby pancakes, and they're an awful lot like a popover. Actually, I didn't decide to make them until this very morning. But my fellow Tuesdays with Dorie bakers requested them, and who am I to question it? At the very least, I could compare them to my Dutch Babies and to the popovers of my childhood.
One this is certain about popovers, they are fun to watch bake and just as fun to eat, My kids loved them (my oldest had three!). And I have to say, I might have enjoyed them even more than the mini Dutch Babies. These popovers are as light as air (even without the suggested extra baking time to dry them out), crunchy on the outside and moist and tender on the inside. Simple perfection.
I suggest you pop on over (ha ha!) to the hosts this week, Paula and Amy (check out her son's great origami hats too, so cute!) to find the incredibly simple recipe. And while you're at it, see how the other Tuesdays with Dorie bakers fared with their attempts to make popovers as well.
Tuesday, July 31, 2012
Blackberry Nectarine Pie {A Tuesdays with Dorie Post}
2. to require; need: a problem craving prompt attention.
I have been craving pie this summer like it's going out of style. Quite the opposite, actually- it's all the rage right now. Little pies, pies in jars, hand pies, and full sized, double crusted loaded with fruit delectable pies. I think I may have to try them all. I've made several in the past few weeks, and they've all been great. But it just doesn't seem to quench my need- I keep wanting more.
It seems crazy. Who craves pie? It's not like I can just whip one up in a few minutes. Making pie is an all day affair- taking patience and refrigerator space and a really hot oven. Who wants to do that in the middle of summer? Me. Little old, pie-needing me, that's who.
There will be small pies filled with jam later this summer. Keep an eye out for them. They'll be something special that you can make into the fall and beyond. But for now I'm filling my pies with the best the season has to offer. The more the merrier, in my opinion. So today I offer you two of my summer favorites, nectarines and blackberries, swimming in their own juices and tucked in between two layers of buttery, flaky crust.
Who's craving pie now?......
This is a Tuesdays with Dorie post, so you know the drill. If you want to make this pie (with a great big scoop of vanilla ice cream and sliced fresh fruit, please), then hop on over to visit the hosts for this week, Hilary and Liz. You can get the recipe there. And be sure to check out all the other Tuesdays with Dorie bakers- they're a great bunch who do beautiful work. One note about my pie, I had some gorgeous blackberries, so they took the place of the blueberries in the original recipe. Nobody complained.
Monday, July 16, 2012
Rosemary Semolina Bread {A Tuesdays with Dorie Post}
Making bread is like coming home for me. It's the simplest of things and the oldest of memories.
I can picture my grandmother standing in her kitchen pulling a fresh loaf out of the oven. I was always at her side, like a little fly buzzing around her legs and getting in the way. I absolutely loved being with her in the kitchen and I could tell that she wouldn't trade those days with me for anything either.
My grandmother was teaching me, sharing all that she knew with me in the only way she knew how. She was a barely literate immigrant from Italy. There were very few written recipes. And the ones that were written were only legible if you could decipher my grandmother's special blend of English and Italian. I quickly learned what a "bustine" of yeast (an envelope) was and that when I was asked for some "sugaro" that I should bring my grandmother sugar. Mostly I learned by watching and by helping. I learned to feel the dough with my own little ball of dough that my grandmother would give me, so that I would know in my hands how a finished dough should feel. I learned what the rising dough should smell like and how to know when a loaf was baking and ready. It's all thanks to my Nana.
Which is why I jumped at the chance to host this week's Tuesdays with Dorie recipe- semolina bread. It's a simple and humble loaf. Not all that pretty to look at, but wholly transformed by one of my grandmother's favorite ingredients, semolina (a milled durum wheat that is typically used in making pasta). It reminds me of her and of our times together in her kitchen when I was a child. The bread is a little bit nutty and golden from the semolina, and completely filled with the fragrance of my Nana'a kitchen.
Please visit the other Tuesdays with Dorie bakers and their beautiful blogs- see how they enjoyed making and eating this wonderful bread.
Rosemary Semolina Bread
From Baking with Julia, written by Dorie Greenspan. Recipe contributed by Nick Malgieri.
For a printable version, click here.
I vowed that I was going to follow this recipe to a "t" when I learned I was hosting this week. I was doing really well until I spotted the rosemary sitting on my counter that my husband had just cut from our garden plant. I couldn't resist chopping up a couple of sprigs and tossing it into the dough as it whizzed around my food processor. And I'm so happy that I did. The rosemary-scented bread made for the best grilled cheese sandwich I have ever eaten. When dipped in our favorite roasted red pepper soup, the sandwich (and the bread) was a home run.
THE SPONGE:
1 cup warm water
1 tsp active dry yeast
1 cup unbleached all-purpose flour
Pour the warm water and yeast into a medium bowl. Whisk to combine. When the yeast has dissolved and is creamy, about 5 minutes, stir in the flour.
Cover the bowl and let it rest at room temperature until the sponge doubles in volume, about 2 hours (1 1/2 hours in a hot kitchen).
THE DOUGH:
the sponge (above)
1/2 to 3/4 cup unbleached all-purpose flour
3/4 cup semolina flour
2 tsp salt
1 tbs olive oil
1 to 2 tbs chopped fresh rosemary
To make the dough in a food processor:
Scrape the sponge into a food processor fitted with a metal blade. Add 1/2 cup of the all-purpose flour and the rest of the ingredients and pulse on and off until the dough forms a ball on the blade. If the dough doesn't form a ball, add another 1/4 cup of all-purpose flour a tablespoon at a time, pulsing to mix it in. Let the dough rest in the bowl for 5 minutes, then process for a full 20 second. The dough will be sticky.
To make the dough in a mixer:
Scrape the sponge into the bowl of a mixer fitted with the dough hook. Add 1/2 cup of the all-purpose flour and the rest of the ingredients (be sure to chop the rosemary very finely because you won't have the blade of the food processor to help you chop it further). Mix on medium speed until you have a dough that is smooth and elastic, but somewhat sticky, about 5 minutes. If the dough is too soft, add up to 1/4 cup more of the all-purpose flour 1 tablespoon at a time.
First rise
Turn the dough into an oiled bowl, cover the bowl with plastic wrap and let the dough rise at room temperature until it doubles in volume, about 2 hours.
Shaping and second rise
Turn the dough onto a floured surface and deflate it by flattening it with your palms. Pat the dough into a rough oval shape and then roll it, from one long side to the other, to form a plump loaf. Tuck the ends under and transfer the loaf to a parchment paper lined baking sheet. Cover it lightly with oiled plastic wrap and allow it to rest until it doubles in volume again, about 2 hours.
Baking the bread
Preheat your oven to 400 degrees.
Holding a single edged razor or sharp serrated knife at a 30-degree angle to the loaf, slash lines up and over the width of the loaf. The lines should be at an angle and about an inch away from each other.
Bake for about 35 minutes, until deeply golden or an instant read thermometer inserted into the bottom of the loaf reads 210 degrees. Transfer the bread toa rack and cool completely.
Storing
The bread can be kept at room temperature for a day; cover it loosely with plastic wrap. For longer storage, wrap it airtight and freeze for up to one month. Thaw, still wrapped, at room temperature.
Subscribe to:
Posts (Atom)